Have you ever wondered whether Raspberry Pi can talk to a satellite? I put this guide together to show you how a Raspberry Pi can indeed connect to a satellite to send and receive short messages.
A satellite transceiver can be used by the Raspberry Pi to send and receive short messages via the Iridium satellite network. These transceivers typically cost between $250 and $470, with a monthly subscription plan of approximately $15 also required to send and receive data via satellites. An antenna and power source is also required.

Connecting a Raspberry Pi to a satellite is useful for:
- Collecting sensor data from remote locations
- Sending commands to other devices remotely (such as operating a motor)
- Locations where there is no cellular coverage available (shipping, aviation, out in the middle of the Australian outback, etc.)
This guide focuses on using the Iridium satellite network with short message communication. Check out the References section below if you’d like more detail on how short message communication works with Iridium satellites.
Step 1: Buy a satellite transceiver and a prepaid communications card
The transceiver is the module that handles communication between the satellite system and the Raspberry Pi. It is responsible for establishing the link with the satellite, transmitting any data out to the satellite, receiving any data in response, and closing the connection. The Raspberry Pi supplies or receives the data via its connection to the transceiver.
A satellite transceiver for Raspberry Pi typically costs between $250 and $470. Transceivers at this price range are designed to work with Raspberry Pi and are supported with the necessary libraries to write code. The most common transceivers for working with Raspberry Pi are locked to communications provider Rock Seven, who subsidise the hardware in favour of usage charges.
More expensive satellite transceivers are available ($500-$1000+), typically in the form of modems with a serial communication link (e.g. RS232). These are designed to work with computers in general using a serial link, and may require some additional coding and tweaking to get running on a Raspberry Pi.
| Transceiver | Cost |
|---|---|
| RockBLOCK 9603N | $267.50 |
| RockBLOCK Mk2 | $274.95 |
| SparkFun Artemis Global Tracker | $468.75 |
| Qwiic Iridium 9603N | $249.95 |
The above transceivers are locked to communications provider Rock Seven who uses the Iridium satellite network. If you want to use a different communications provider, the transceivers can be unlocked for a fee of $60.
Data costs roughly $15 per month for the connection and $18 for 100 credits. Each credit is spent on a 50 byte message sent or received using the satellite network. At 50 bytes, messages sent from the Pi would have to be very specific to a purpose (like a reading from a remote sensor – I wrote a whole guide on connecting sensors to the Pi, check it out here).
I’ve found Rock Seven to be a little more expensive than other communications providers using the Iridium satellite network (see References below), but it appears to be the price paid to have hardware and software libraries developed by the manufacturer designed to support Raspberry Pi.
An antenna is also required for the transceiver to reliably communicate with the satellite. A basic antenna costs roughly $60-$70.
Power required for the transceiver is roughly 0.5W to 2.5W depending on the transceiver’s communication with satellites. It runs at 5V and consumes between 100mA and 500mA. I would try turning it off when not in use if power conservation is an issue. If you’re worried about how much power your Raspberry Pi project is going to use, check out my guide here for some estimates on the power consumption of a Raspberry Pi in different scenarios: chipwired.com/raspberry-pi-power-use
Step 2: Connect the transceiver to the Raspberry Pi
Most satellite transceivers expose a serial interface that can be used to communicate with the Raspberry Pi. This is typically UART or I2C. Most of the satellite transceivers I looked at also included RS232 communication, though I wouldn’t recommend using this to interface with a Raspberry Pi (it’s too complicated, convert it to USB instead if you really must use RS232).
The interface for the 4 transceivers I listed above is described in the table below:
| Transceiver | Interface |
|---|---|
| RockBLOCK 9603N | UART, USB (RS232) |
| RockBLOCK Mk2 | UART, USB (RS232) |
| SparkFun Artemis Global Tracker | SPI, I2C, USB |
| Qwiic Iridium 9603N | I2C |
The SparkFun Artemis Global Tracker is essentially a microcontroller in its own right, so you can program it with your own code for communicating with your Raspberry Pi over SPI, I2C, or even via the satellite communication link.
I recommend using UART, SPI, or I2C to communicate between the Raspberry Pi and a satellite transceiver. I’ve found these protocols easier to work with than USB/RS232.
To connect the transceiver to the Raspberry Pi, wire the Raspberry Pi GPIO pins to the corresponding transceiver pins depending on which communications protocol you’re using. An example for I2C is to use the pins highlighted below:
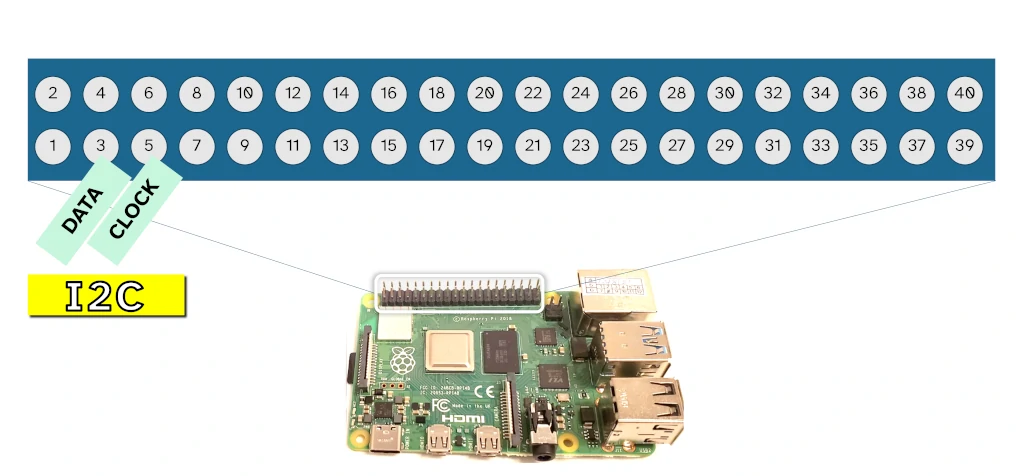
For more detail of the pin numbering, check out the guide here.
A decoupling capacitor and pull-up/down resistor may also be required depending on the type of communication protocol you decide on.
Step 3: Write the code
Code used for communication between the Raspberry Pi and the satellite transceiver is typically written in Python or C. There is also a Node.js library that seems to be available, but I couldn’t get access to try it out. The easiest way I found to get started with Raspberry Pi is using Python.
To communicate with the satellite transceiver using Python:
- Import
rockBlock(the pyRockBlock library) - Establish a connection with the transceiver
- Send or receive a message to the satellite network
- Close the connection
A more detailed guide with code examples can be found on the website of the library author here. This library appears to work with a USB or UART connection to the transceiver.
Note that when running your code, it will probably take a while to establish the connection with the satellite network (20-30 seconds). Don’t be surprised if things are a bit slow when your code is running.
There is also an easy setup utility available if you’re using the Artemis Global Tracker, check it out here.
You will also need to register with the Rock Seven online portal before being able to communicate with a satellite. Check it out here.
References
Useful links:
- Estimate your Raspberry Pi power consumption with my guide here: chipwired.com/raspberry-pi-power-use
- Learn more about Rock Seven costs here
- Learn about an alternative to Rock Seven (though I find it not as straightforward for working with a Raspberry Pi) here
- Compare prices for hardware here
- Datasheet for the RockBLOCK 9603N
- Datasheet for the RockBLOCK Mk2
- Datasheet for the SparkFun Artemis Global Tracker
- Datasheet for the Qwiic Iridium 9603N