When I first started building circuits with Raspberry Pi, I was confused by the overwhelming choices for wires (and other components) that could be used in my circuits; I had no idea if I was choosing the right wire for my Pi and for my project. This guide is the culmination of my research and experience in choosing wires for use in Raspberry Pi projects. The focus of this guide is wires rather than cables.
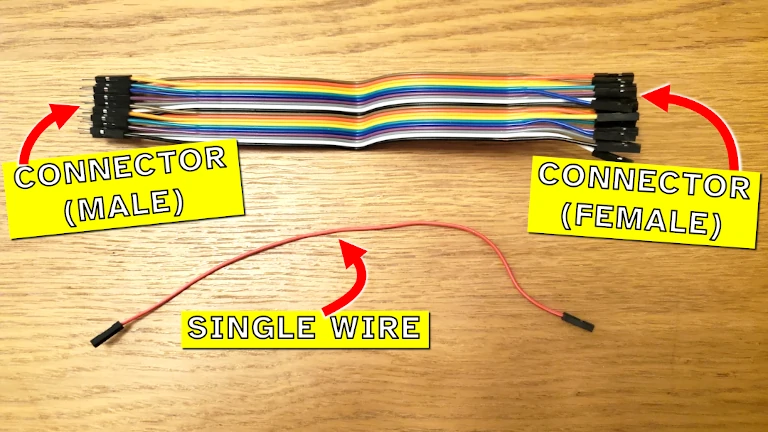
When building a Raspberry Pi project, it is best to use 22 AWG single-stranded copper wire with connectors suitable for the GPIO (female) and a breadboard (male). These are typically purchased in bundles costing between $10 and $20. Avoid using stranded or braided wire if building a circuit with a breadboard.
If you’re getting started with Raspberry Pi, buy two bundles of 22 AWG single-stranded wire – one with female-female connectors and the other with male-male connectors. This will take care of most beginner circuits you want to make (it will allow you to connect the GPIO to sensors and other devices, as well as breadboards). This should cost $10-$20 depending on how many you buy in each bundle.

In this guide I’ve looked at:
- Size, voltage, and current of wires to use with Raspberry Pi
- How to buy those wires
- Wires to avoid in your Raspberry Pi circuits
Wires to use with Raspberry Pi
The following wires can be used with Raspberry Pi:
- 20 AWG single-stranded copper
- 22 AWG single-stranded copper
- 23 AWG single-stranded copper
The most common wire to use with Raspberry Pi is 22 AWG breadboard wire. Typically this is purchased as a bundle of wires that have a male or female connector attached to the end. A male connector end is useful for plugging into breadboards, while a female connector end is useful for connecting to pins (such as those on the GPIO).
Size of wire to use
| Wire Size (AWG) | Metric Size (mm2) |
|---|---|
| 20 AWG | 0.5mm2 |
| 22 AWG | 0.34mm2 |
| 23 AWG | 0.28mm2 |
AWG refers to the American Wire Gauge standard sizes for the cross-section of a strand of copper in a wire. The larger the number the smaller the cross-sectional area of the strand of copper. Size 22 is equivalent to a cross-sectional area of 0.33mm2 (where mm2 is the international standard for the cross-sectional area of copper strands, and the one I’m more familiar with). I found this guide helpful for understanding AWG.
Voltage and current of wires
| Wire | Maximum Current (estimated) |
|---|---|
| 20 AWG | 1.5A |
| 22 AWG | 1.0A |
| 23 AWG | 0.725A |
Larger wires carry more current. Digital electronics, such as Raspberry Pi, does not need much current, it can use the relatively small 22 AWG. The larger 20 AWG may be useful in other parts of your circuit (not connected to the Raspberry Pi) for powering motors.
All these wires work at the 3.3V or 5V level suitable for Raspberry Pi.
Costs and how to buy wires
Wires are bought pre-cut, on a spool, or with connectors already attached (jumper wires). When starting with Raspberry Pi, I recommend buying a bundle of jumper wires as these will make it easier to connect circuits to the GPIO. Try to get a mix of male-female and female-female jumpers. Pre-cut wires are good for building a circuit on a breadboard, and a spool is only worth it if you’re buying a lot of wire as you have to strip the ends yourself.
| Wires | Cost (typical) |
|---|---|
| Jumper Wires | $15 for 100 pieces |
| Pre-cut | $20 for 500 pieces |
| Spool | $34 for 150ft |
All of the above are for 22 AWG. Technically 20 AWG should be more expensive and 23 AWG should be cheaper, however the quantities above are very small so the price difference of the copper used in the wire is negligible.
Pre-cut wires often do not have the connector attached for plugging in to the GPIO. While it is possible to add your own connector (necessary for the female end, optional for the male end), I’ve always found it painful to fiddle around with the little bits of plastic. I’d recommend buying “jumper wires” for connecting to the GPIO, and then using the pre-cut wires on the breadboard itself.
Buying a spool is worth it if you’re going to use a lot of wire. Spools are cheaper to buy, but the downside is that you have cut the wire, strip back the insulation, and then attach a connector if you need it. This is good if you want to build a project that will be put into use, but I’ve always found this cumbersome when trying to prototype something simple.
Interested in how I used wires to build a basic sensor project with Raspberry Pi? Check out the video below:
Wires to avoid with Raspberry Pi
Avoid using these wires with your Raspberry Pi:
- Stranded wire
- Anything smaller than 23 AWG (i.e. a bigger AWG number)
- Non-copper wires (e.g. steel or aluminium)
Stranded wire is not good for working with breadboards. It is great for use in situations where you need wires to bend and flex in tight scenarios. It is not good for connecting to breadboards as the breadboard springs cannot do as good of a job of holding the wire in place. Stranded wire can also be more difficult to insert into the holes.
Braided wire should be avoided for similar reasons.
Smaller wires are also not good for breadboards. Thinner wires, such as 24 AWG or 28 AWG also may not fit securely into the breadboard. These wires are designed for low-power-use data communications and cable management, use cases that you typically don’t need to worry about with Raspberry Pi. The advantages don’t outweigh the downsides.
Copper wires work best for use with Raspberry Pi. Wires are also typically made out of steel or aluminium, but the advantages of these materials are unnecessary for Raspberry Pi circuits. These metals don’t carry current as well, while the upsides are in strength and weather proofing – I haven’t seen many Raspberry Pi projects that need these benefits.
Chris used to wire up simple breadboard analogue circuits well before he even knew what a microcontroller was. He writes guides like this to help clear up some of the confusion that can arise when first getting started in the world of electronics
