To help anyone prevent their Arduino from crashing or hanging, I ran a series of experiments to determine all the ways an Arduino can crash, hang, reset, freeze, stop running code, or do something strange. I put together the results of these experiments as a guide on how an Arduino crashes or hangs, and how you can prevent this happening to you.
1. Calling too many functions
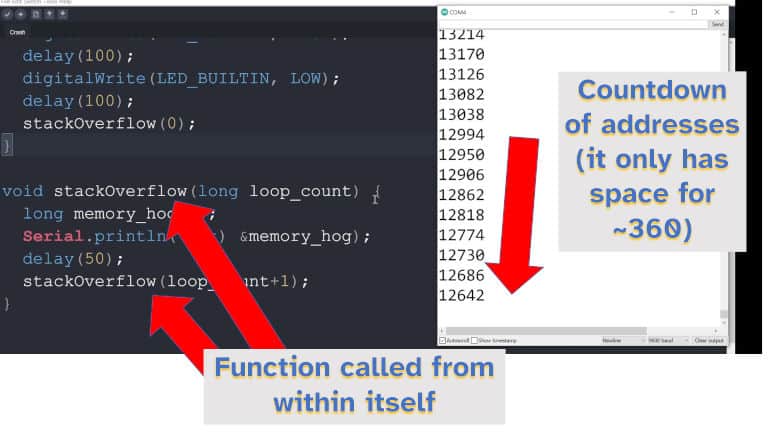
Calling too many functions, such as in a recursive loop, can cause an Arduino to crash and reset. From an experiment conducted, this can occur after roughly 300 function calls. Having functions with more local variables, or larger local variables, decreases the number of function calls that can be made before the Arduino resets. A recursive loop of functions is the most likely way to reach this function limit.
// Recursive loop - a function that calls itself
reFunction(int a) {
  if (a > 10000) return; // how to end the recursion
  reFunction(a++); // recursion
}
Each function call consumes some of the Arduino’s memory; once the Arduino runs out of memory for functions it typically resets (as if the external reset button had been pressed) and runs setup() again.
I tested this on my Arduino UNO WiFi Rev 2. I built a small function that has 1 argument and 1 local variable. By incrementing the argument in the recursion, I could see how many times the recursion occurred before the Arduino reset. On this Arduino model it was approximately 360 call to this function.
Arduino models with more memory will probably allow more function calls; Arduino models with less memory will probably allow less function calls.
To prevent an Arduino from crashing due to too many function calls:
- If using recursive functions, ensure the condition to end the recursion doesn’t take too long to occur
- Consider using a
fororwhileloop instead, most Arduino applications do not need recursive functions - Reduce the number of local variables within the function; if a recursive function must be used, reducing the number of local variables will allow for more function calls to fit in the Arduino memory.
2. Allocating too much memory
If an Arduino runs out of memory it can crash, get stuck, or behave in an unpredictable manner. The easiest way for an Adruino to run out of memory is by allocating too many variables or too much space to variables, such as by using the malloc() function. It is also possible to run out of memory using function calls (as described above).
I ran an experiment where I allocated all the memory on my Arduino (an UNO WiFi Rev 2) to see how the Arduino behaved. Once all the memory was allocated, any further request for memory would not work, however function calls would still work. I also found there is no memory protection on an Arduino and I could reference any address I wanted (I love the feeling of power when working an Arduino).
To prevent an Arduino crashing from running out of memory:
- Declare variables in a function when preparing a sketch, for most Arduino projects it should be possible to calculate the variables needed when writing the code; the compiler will warn you if these get too large;
- Avoid using
malloc(); - Use
free()if usingmalloc()is unavoidable, a sketch may still run out of memory despite usingfree()(due to the implementation ofmalloc()) but it’s less likely.
If you need more data storage on an Arduino, I wrote a whole guide listing a bunch of different ways to store data with Arduino (from a few kilobytes up to hundreds of gigabytes. Check it out here: chipwired.com/arduino-store-data/
3. Stuck in an infinite loop
An Arduino can appear to hang if it gets stuck in an infinite loop that prevents it from executing other code. This is typically caused when the code is checking a loop condition that will always end up true.
// Accidental infinite loop
int a = 0;
while(a == 3){
  a = returnThree(); // a function that always returns 3
}
Technically the Arduino is always running an infinite loop (the void loop() function), but an Arduino can appear to hang if it gets stuck in a loop that you didn’t intend it to. Unlike a PC, an Arduino isn’t typically capable of executing two programs at the same time. This means if a sketch gets stuck in a loop, the whole Arduino will typically stop executing any other task.
Recursive functions, mentioned above are also a type of infinite loop. In addition to the recursion where a function calls itself, it’s also possible for functions to call each other in a loop.
// Accidental infinite loop with functions
function x() {
  y();
}

function y() {
  x();
}
To prevent infinite loops:
- Read through the flow of your code and make sure the conditions to exit an infinite loop
- Plan the conditions under which functions will be called, try to avoid an infinite loop of functions
- Use call back functions and interrupts rather than waiting in a loop until something happens (see interrupt handling below)
If you are using infinite loops to wait for an input, it is possible to run other code while waiting. I found this task scheduler library that allows an Arduino to execute multiple parts of a sketch simultaneously. It seems a bit hard to set up, but it does appear to work on a wide variety of Arduino boards.
4. Waiting for a function to return
An Arduino can appear to hang when it is waiting for a library function to execute. When an Arduino is waiting for a function to execute it is typically unable to process other code (unless using something like the task scheduling library I mentioned above. This is typically because these functions are doing something else on this list causing the Arduino to hang or crash (e.g. they’re stuck in an infinite loop).
The most common function I see this happen in is Serial.available(). I often see people use this as the condition on a loop meaning the Arduino will get stuck in the loop until a serial connection is available; if no connection becomes available the Arduino will not execute any other code.
void setup(){
  Serial.begin(9600);
  while(!Serial.available()); // wait for the serial connection
}

void loop() {
  // do stuff
}
In the above example, the Arduino will appear to hang on startup if there is nothing available to be read from the serial connection. While I haven’t looked into the depths of Serial.available(), I imagine it’s implemented using an infinite loop that waits for data to be available.
To reduce the likelihood that function calls will crash or hang your Arduino:
- Ensure it is possible for your Arduino to exit infinite loops, such as in the example above, providing a serial connection for data to be read from;
- Consider the ‘promise’ library functions are making when you call them, does this promise (e.g. serial available means asking the serial connection if something is available) of the function imply it could enter an infinite loop. Check the Arduino Reference, or the library’s documentation if unsure.
5. Incorrect interrupt handling
An Arduino can appear to hang if it is constantly serving interrupts rather than executing its main code. If the processor continually jumps to interrupt service routines, it will be unable to complete other tasks and thus appear to hang.
A typical execution flow for an interrupt is:
- Register an interrupt handling function to a particular event in
setup()(this function will be executed by the processor when the event occurs); - Arduino executes its
loop(); - Event occurs, and Arduino goes to execute the interrupt handling function;
- Arduino returns to executing
loop().
If the Arduino is flooded with interrupts before it can finish handling them, it may never be able to finish processing them and it will appear to hang. I used this page as a reference for Arduino interrupt handling.
To minimise the chance of an Arduino hanging when processing interrupts:
- Spend as little time processing interrupts as possible, minimise the code in your interrupt handling function;
- Consider atomicity of modifying variables when handling an interrupt, it is possible to interrupt an interrupt handler with the same interrupt (confusing I know!);
- Instead of turning interrupts on and off, consider saving the state of the processor’s registers, turning interrupts off, then restoring the state of the registers – this prevents accidentally turning interrupts back on when they should be off (by another handler)
6. Power brown-out
An Arduino will crash and reset if the input voltage drops below a certain level. A warning can be configured to start executing an interrupt handling function when the voltage starts to drop; once it reaches the brown-out level the Arduino will crash and reset.
A brown-out typically occurs when there is a significant and sustained drop in the power supply voltage, outside the Arduino’s tolerance levels. This can be caused by:
- If the Arduino is running on battery, the battery running out of power
- Significant noise or disruption on the power supply
- A sudden draw of current by another device incorrectly configured to share a supply with the Arduino (e.g. a poorly configured motor)
Voltage input levels vary by Arduino model: For example, the UNO family is typically 7V to 12V (or USB 5V) while MKR family is 5V.
Most Arduino boards, certainly the ones produced by Arduino themselves, have decent quality power management circuits (such as voltage regulators) built into the board. I’ve found that as long as you stick to the voltage requirements on the data sheet, and supply enough current, there shouldn’t be a problem.
To avoid an Arduino resetting due to brown-out:
- Provide a stable power supply, most commercial power supply equipment (including phone chargers) within the compatible specification should work;
- Be careful connecting circuit components that use a lot of current (e.g. motors) to the same voltage source that the Arduino uses, a sudden draw of current may disrupt the Arduino’s supply.

7. Incorrectly configured watchdog timer
An Arduino will reset if the watchdog timer has been enabled and reaches the end of its countdown period without being cleared by code. If the Arduino fails to clear the watchdog timer prior to the time running out, the watchdog will restart the Arduino.
Forgetting to clear the watchdog timer in code, or not doing it often enough, can lead to the appearance of the Arduino crashing.
Check out the example sketches here to see more on how to configure the watchdog timer so that it doesn’t unexpectedly crash your Arduino.
How to know if your Arduino is still alive
To demonstrate that an Arduino is still executing code correctly, a heartbeat routine is commonly used. A heartbeat for Arduino is the flashing of an LED by a fixed pattern, such that it can be observed that if the LED fails to follow that pattern, then the Arduino is not executing code correctly.
If a heartbeat LED is coded yet it is not flashing, then the Arduino has crashed or is hanging. The pattern of the flash is important as an Arduino stuck in a restart loop (e.g. thanks to the watchdog timer) might still flash the LED, but at the wrong pattern.
An example heartbeat routine is below:
void loop() {
  do_stuff();
  heartbeat();
  delay(200);
}

void heartbeat(){
  //toggle LED
}
I prefer this toggle approach so you can see if the Arduino is taking a long time to process things. If the heartbeat becomes uneven it means that either the do_stuff() is taking too long, or the processor is handling a lot of interrupts.
References
In putting this guide together I used a few references. If you’re interested in reading more on these, check out the list below:
- Interrupts
- Data sheet for the processor at the heart of my Arduino (an UNO WiFi Rev 2)