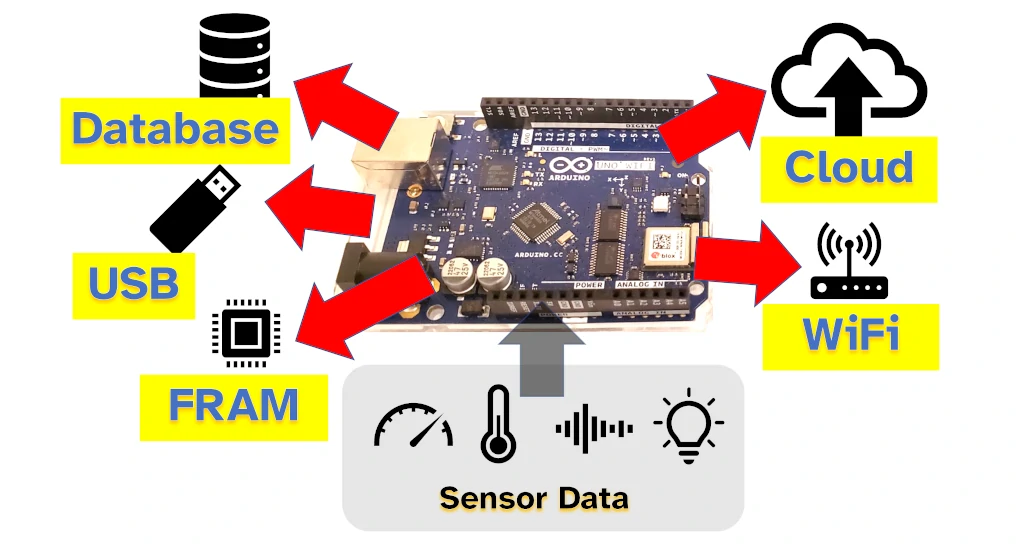
A guide to various ways Arduino can save data. I believe in using Arduino as part of a data collection and analysis process; part of this process is using Arduino to store data. In this guide I’ve listed various ways that Arduino can store data so that it can be later analysed and acted upon.
An Arduino can store data in case of power loss, or to be shared with another computer. The built-in EEPROM typically offers 1 kilobyte to 4 kilobytes of storage which is protected against power loss. An Arduino can also send data to another computer using WiFi, Ethernet, Bluetooth, or the serial connection. SD cards and USB flash drives can also be used from an Arduino sketch.
The best ways to store data depend on your project:
- To store small amounts of data, such as recent measurements, try the EEPROM;
- To collect data over a long time that will be shared with a computer, try an SD card;
- To analyse data on another device, try storing the data in the cloud.
I wrote this guide as part of a series on Arduino data analysis. If your project involves working with data in any way, check out my complete guide here: chipwired.com/analyze-data-using-arduino/
1. EEPROM
EEPROM is a section of memory that is safe when the Arduino loses power. This means that data saved to the EEPROM can be read using a sketch even after the Arduino has been turned off and turned back on. Think of EEPROM as a tiny flash drive built in to your Arduino. EEPROM costs nothing to use if it’s included with your Arduino (see FRAM below if your board doesn’t have EEPROM).
Using EEPROM on an Arduino is generally a good idea when you have an unreliable power supply and need to quickly save small amounts of data to protect against power failure. Some of the ways I’ve seen this used include:
- Recent readings from a sensor, such as saving the last few measurements so that these can be recovered if the power is lost;
- Current ‘state’ of the sketch, if your sketch represents a state machine, saving state information to the EEPROM can allow the Arduino to recover quickly after power failure
EEPROM can only store small amounts of data. The table below shows how much EEPROM space Arduino models have:
| Model | EEPROM |
|---|---|
| UNO Rev 3 | 1024 bytes |
| Mega 2560 | 4096 bytes |
| Nano | 1024 bytes |
| Due | 0 |
| Leonardo | 1024 bytes |
| UNO WiFi Rev 2 | 256 bytes |
1024 bytes can store about 500 temperature measurements (i.e. using two bytes of memory for each reading).
Some popular Arduino boards do not have EEPROM. These include the MKR series and the Arduino Due. While EEPROM can be added to an Arduino, I’d typically recommend using the other data storage options in this guide (e.g. NAND flash which is very similar).
To use EEPROM with Arduino:
- Include the EEPROM library:
#include <EEPROM.h> - Write to the EEPROM using the following function call:
EEPROM.put(address, data); - Track which addresses you’ve used (if needed you can store this at the start or end of the EEPROM, addresses start at 0 and each byte is addressed; alternatively consider using a magic number)
- Read from the EEPROM using the following function call:
EEPROM.get(address, data);
For more detail about how to use these functions (and the difference between put/get and write/read), the official Arduino reference is here.
If you’re interested in the different types of memory that an Arduino can use, I’ve written a whole guide to that here: chipwired.com/arduino-memory-amount-guide/
2. SD Card
An Arduino can use an SD card plugged into a shield connected to the Arduino. The Arduino libraries support standard SD cards and SDHC cards. The file system must be FAT16 or FAT32. If using with a computer, FAT32 offers greater compatibility with modern PCs.
Using an SD card to store data from an Arduino is good when:
- Data needs to be transferred to a computer or another device
- Collecting the data is not urgent or time sensitive
- A large amount of data is going to be stored
Some of the best uses of SD cards I’ve seen are when the Arduino is set up as a remote monitoring device, such as remote data collection on a farm. Some data is not time sensitive, such as long-term weather patterns, and the Arduino can save this data to an SD card. Then someone can retrieve the SD card and analyse the data on a computer.
SD cards aren’t great if you will have trouble removing the card from the Arduino (e.g. it’s in a case).
Typical SD card sizes can be anything from 1GB to 32GB (or larger!). These cards can store millions of measurements, complex instructions, and any other information your Arduino might need.
To use an SD card with Arduino:
- Buy an SD card shield and an SD card
- Format this SD card for FAT32 (using a computer)
- Connect the shield (SPI) and plug in the SD card
- Use the
SPI.handSD.hlibraries to access the card from a sketch
The reference for the SD card library is here. I also found this tutorial helpful for getting started with SD cards.
SD card shields typically cost $10-$20 (example here from Walmart) and SD cards are roughly the same ($12 example here – SD cards must be 32GB or less).
I compared the best shops to buy Arduino components (based on costs and shipping) here: chipwired.com/arduino-component-shops/
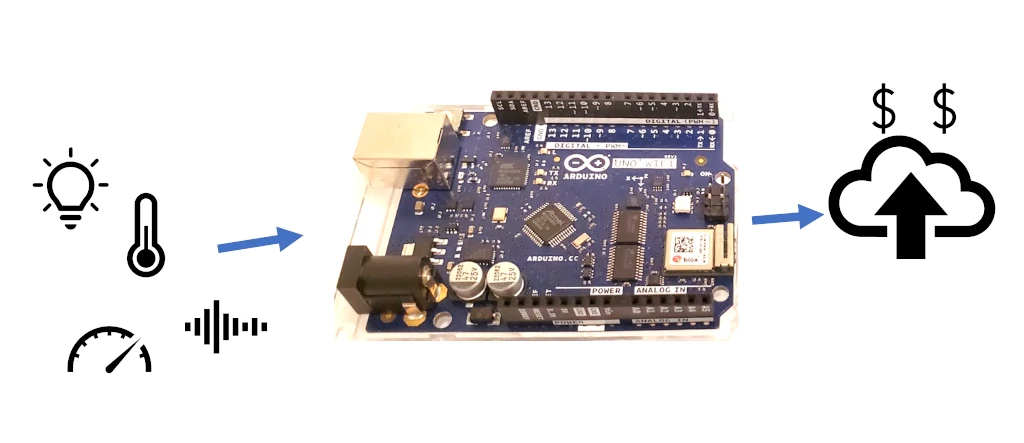
3. Cloud data storage
An Arduino can save data to cloud services using its network connection capabilities. The easiest way to save data to the cloud from an Arduino is to transmit that data directly to a cloud API using Ethernet or WiFi. An Arduino can also communicate that data to another device using serial or Bluetooth connections, and that device then saves the data to the cloud.
Having an Arduino store data in the cloud is good when:
- Power is not an issue, such as when the Arduino is connected to mains power. Communicating with the cloud increases power use.
- Real-time data analysis is required. Data uploaded to the cloud is available near instantly for other services and for analysis.
- A back-up of data outside the Arduino is required (for example if the power might be cut).
Storing data in the cloud is not great if your Arduino needs to run from a battery, or otherwise in a low-power scenario. This is because the Arduino needs that power to transmit its data over wireless or wired connections to save to the cloud; it also typically communicates over the internet to do this. In low-power projects, try connecting the Arduino (preferably by serial, but can also be intermittent Bluetooth) to another device and have that device maintain the connection with the cloud.
In general, to use an Arduino with the cloud:
- Create an account with the cloud storage provider
- Include the WiFi or Ethernet library in your sketch
- Connect to the cloud storage using the API details provided
I wrote a whole guide to free Arduino cloud storage providers (and how to use them) here: chipwired.com/arduino-free-cloud/
4. FRAM
Ferroelectric Random Access Memory (FRAM) is a type of memory that retains its data even when the power is cut. Arduino compatible FRAM chips are available in sizes ranging from 8 kilobytes to 512 kilobytes and cost roughly $6 to $18 for these sizes. The FRAM chip is connected to the Arduino using SPI or I2C.
Using FRAM to store data with Arduino is good for:
- Storing data so that it’s not lost when the power goes out (for boards that don’t have EEPROM)
- Storing more data than the built-in EEPROM allows
- Additional RAM for sketches that need a little more working memory
FRAM is versatile as it can be accessed quickly and doesn’t lose its values when the power is cut. This makes is great to use for long-term data storage, in an environment where power may not always be available, and as an additional bit of memory that a sketch can use (access time is fast).
To use FRAM with Arduino:
- Buy an FRAM chip (suggest getting it on a breakout board when building a prototype)
- Connect it to the Arduino (I2C is the preference, but SPI is also available)
- Include the relevant library
- Use the library’s functions to read and write to the FRAM
I say I2C is the preference only because it was easier to find Adafruit’s instructions on how to use I2C FRAM with Arduino (check out the library here). They also sell the FRAM breakout boards here.
5. Database on another device
An Arduino can send data to another device, such as a computer or Raspberry Pi, for storage in a database or a file. The Arduino can do this using WiFi, Ethernet, or the USB serial connection on the Arduino. The receiving device can then save that data in a file or a database.
Having the Arduino send data to another device for storage is good when:
- A database is running on the other device (allowing for easy analysis later)
- Multiple Arduino boards are all sending their data to a central device
- Time is important (this is one of the fastest ways to get data out of the Arduino)
An Arduino can send data to the other device using WiFi, Ethernet, Bluetooth or the serial connection. Most of the projects I’ve seen this done on are using WiFi: All devices are connected to the same WiFi network, one central computer sets up a server to receive data, and multiple Arduino boards can send data to it using the WiFi.
Not sure if your Arduino has WiFi or Bluetooth? I wrote guides to help you figure that out and get started with each option, check them out here: Chip Wired – WiFi; Chip Wired – Bluetooth.
There is no additional cost in setting up a server and database to receive data from an Arduino, all the software is available for free. The costs of doing this depend on the computer and networking hardware you’re going to use.
In general, to use a database with Arduino:
- Setup another device, such as a laptop or Raspberry Pi to host the database and run a server
- Connect Arduino boards to the device using WiFi, Ethernet, Bluetooth or the serial connection
- Send the data to the other device and have it save that data in the database (or a file)
If you’re setting up a Raspberry Pi to save data from an Arduino, I wrote a guide to different databases that work on Raspberry Pi, check it out here: chipwired.com/databases-for-raspberry-pi/. You’ll also need to setup a basic server to receive data, instructions can be found here.
6. USB Mass Storage (flash drive)
A USB flash drive can be plugged into an Arduino for a sketch to use as data storage. The flash drive must be formatted to use the FAT16 or FAT32 filesystems, if the latter is used any size of flash drive can be used by the Arduino. Typically a USB host shield must be used to plug the flash drive into.
Using a USB flash drive with an Arduino is good for:
- Sharing data between the Arduino and computers
- Collecting a lot of data (hundreds of gigabytes can be stored on a flash drive)
I found it really hard though to figure out the libraries to communicate with a USB flash drive from an Arduino sketch. Library support isn’t as good as for SD cards, meaning it feels harder to work with the file storage system of a USB flash drive.
In general, to store data on a USB flash drive:
- Connect a USB host shield to the Arduino
- Connect a USB flash drive to the host shield
- Import the USB mass storage library in a sketch
- Read or write to the USB flash drive
I found this USB host shield available for purchase, and I found a library to go with it here. I couldn’t find any further detail on how to use the library, it seemed like reading the code was necessary.
It’s also fairly expensive to use a USB flash drive with Arduino. The host shield can cost over $30, and then a flash drive will cost a few dollars as well.
Overall I don’t recommend using a USB flash drive with Arduino (this is why it’s at the end of my list). There are better options available, such as using an SD card.
Chris believes in using Arduino as part of the journey to better data analytics. This means improving data analysis techniques by using an Arduino to effectively collect and store data for later analysis.