Starting out new with Arduino programming? This guide is intended to help you figure out where to get started including how to write a program (sketch), common statements that are used in a program, and how to use libraries.
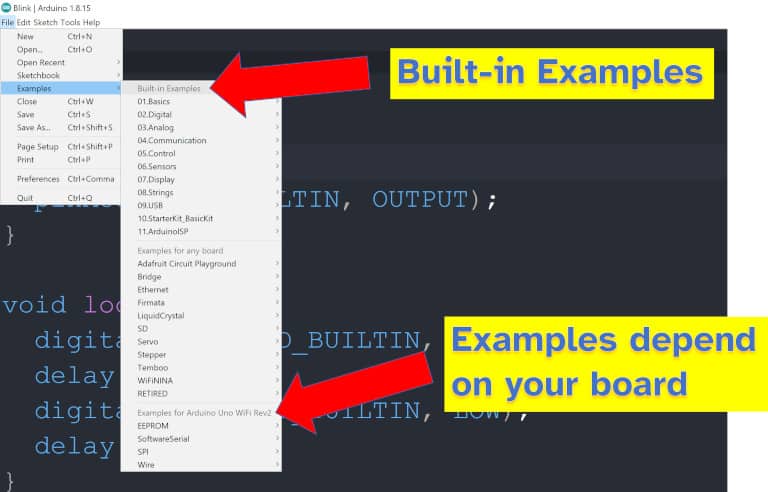
The Arduino programming language is based on C++ with the addition of special functions and libraries designed to work specifically with Arduino and its microcontrollers. It is not required to have a deep understanding of C++ to start writing programs (called sketches) for Arduino. The Arduino IDE provides extensive example code to assist in starting a project.
The easiest way I’ve found to get started is to open up one of the Arduino IDE examples, and then modify the code to suit your project. The Arduino IDE also helps to manage the inclusion of libraries, as well as compiling and uploading code to the Arduino board.
In this guide I’ve included:
- How to write your first program
- How to control a program (with common statements often used in an Arduino sketch)
- Using libraries
Feel free to copy and paste any code from this guide into your sketches to use them.
How to write an Arduino program
To write an Arduino program:
- Open up the Arduino IDE
- Create a new sketch, it should contain the setup() and loop() functions
- Include any libraries that are to be used
- Add code to the sketch
- Connect the Arduino to the computer
- Compile and upload the sketch using the IDE
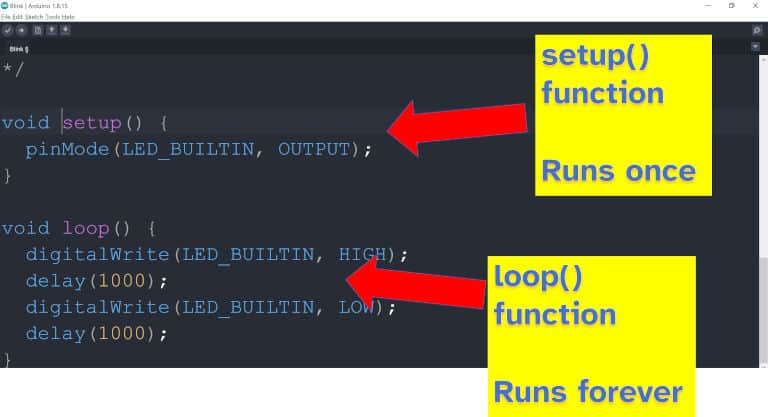
An Arduino sketch is a collection of code, including libraries, designed to be compiled and uploaded to an Arduino. Every Arduino sketch includes a setup and a loop function which are executed by the Arduino board. A sketch can include additional functions defined by the programmer, and can also include additional libraries of code. Sketches are written in Arduino C++ typically using the Arduino IDE.
If you’re not sure on what code to include in a sketch, I’ve given some examples of statements that can be used below. I usually like to load an example from Arduino, save it under a different name, and then modify the code to make my own sketch. I believe Arduino provides these examples to help you with this purpose.
I wrote a full guide on how to upload code to an Arduino, including step-by-step instructions (with pictures) for using the IDE. Check it out here: chipwired.com/uploading-code-arduino/
What is the difference between Arduino setup and loop
The difference between the setup and loop functions in an Arduino sketch is that the setup function is executed once by the Arduino after it is turned on or reset, while the loop function is executed infinitely (in a loop). The loop function starts running after the setup function is finished. Interrupts and calls to other functions can temporarily stop the loop function running, however the Arduino will eventually return to this loop function.
How to control an Arduino program
To describe and control an Arduino program, a set of statements can be used to describe how the sketch is to behave. I’ve included details below about the common statements that are used to define and control an Arduino sketch.
These are some of the statements I’ve found most useful when helping people get started programming Arduino sketches. If you’re interested in a more comprehensive guide, the Arduino Reference has a complete list of everything needed to write a sketch. I found it a bit complicated at first to use the Reference, but it is the go-to source material for a lot sketch-related queries.
Variable Statements
Variables are used to store numbers, text, or other types of data in the Arduino memory. They can typically be created or modified from within a sketch, such as by reading data from a sensor. The data stored in the variable can be modified before being sent to another computer.
// Example variable statements declaring an int and a byte
int readingOne;
byte output = 0;
Note: The first line is a comment that will not be interpreted by the Arduino IDE.
Mathematical Operations
Mathematical operations can be performed on the data stored in variables. In addition to the standard variables you can find on a calculator, the Arduino programming language also supports bitwise operations (that can work on the binary representation of the data – Wikipedia is a good source of info for this).
int x;
int a = 3;
int b = 4;
x = a + b;
// x will hold the value 7
If-Else
To control the flow of an Arduino sketch you can use if-else statements. The Arduino will execute one section of code if a condition is true, and a different section of code if the condition is false.
if (reading == 1) {
  // do something with the reading
} else {
 // this happens if the reading isn't 1
}
Loops
Arduino sketches can also typically be controlled using for and while loops. The Arduino will execute the code inside the loop as long as the condition for the loop is true.
for(x = 0; x < 3; x++){
  readData(x);
}

// --- alternatively ---

x=0;
while(x < 3){
  readData(x);
  x++;
}
// both loops accomplish the same thing
Functions
Functions allow a logical separation of code within a sketch. They also provide an entry point for different states the processor is in, such as when it starts up or when it handles an interrupt. Every Arduino sketch must include two functions: setup() and loop().
setup() {
  //do something
}

loop() {
  myReadData();
  delay(100);
}

myReadData() {
  digitalRead(7);
}
One of the best uses of functions is to bundle them up into a library for distribution.
How to use Arduino libraries
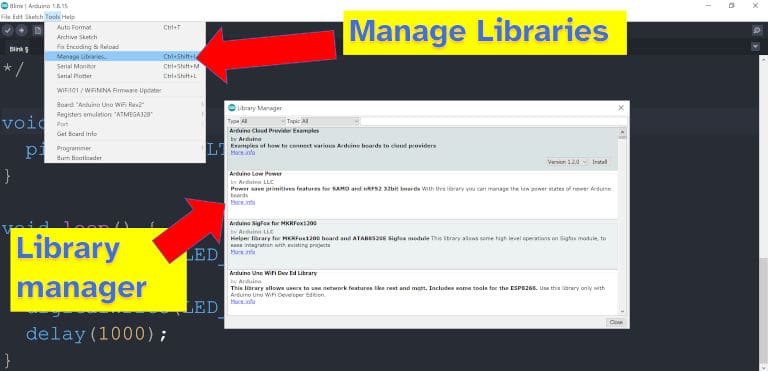
When writing an Arduino sketch, libraries can be included for reference using the #include statement. A library provides additional functions that control how the Arduino behaves, or allows the Arduino to communicate with other devices, without you having to write the code yourself.
To use a library in an Arduino sketch:
- Check that the library is available using the library manager
- Include the library in your sketch using the
#includestatement - Follow the instructions provided by the library for using it
The Arduino IDE will help you manage libraries to ensure you have the latest date.
Some of the most common libraries I use when writing sketches include:
| Library | Uses |
|---|---|
| EEPROM.h | Read and write the EEPROM memory on Arduino boards which have some. Freedom is provided to specify any address to read or write from. |
| SD.h | Read and write an SD card, including setting up the card and creating a directory structure. |
| SPI.h | Allows communication over the Serial Peripheral Interface (SPI), useful for connecting to shields and sensors. Some other libraries, such as WiFi or SD, may require the SPI library to be included. |
| WiFi.h | Allows a WiFi equipped Arduino to connect securely to a WiFi access point, or to establish a secure WiFi access point. |
| Bluetooth (ArduinoBLE.h) | Used for establishing Bluetooth connections, including support for Bluetooth Low Energy (BLE). Only works on Bluetooth equipped Arduino boards. |
Libraries are typically referred to with this .h suffix as that’s the file type for header. A header is the entry point to the library which allows the Arduino IDE/compiler to find the rest of the code in the library.
To write your own Arduino library: Write out the functions and classes that you want to define in a separate .cpp file. Then create the associated .h file. Point the Arduino IDE to the library to have it compile them for your sketch. I’ve found the easiest way to get started with writing a library is to copy another one and modify it – check the license of the library when doing this.
If you’re interested in how I use the EEPROM and SD card libraries to store data when the Arduino loses power, check out my guide to Arduino memory here: chipwired.com/arduino-memory-amount-guide/
How to upload code to your Arduino
In short, to upload code:
- Make sure the Arduino is connected, usually using a USB cable
- Open the Arduino IDE and make sure your board is selected
- Prepare a sketch (see above)
- Upload the sketch using the IDE
I’ve written a full guide about how to upload code to an Arduino, you can find it here: chipwired.com/uploading-code-arduino/
Further Reading
The Arduino Reference is a great source of information for understanding how and when to use common functions and statements to build an Arduino sketch. It also includes a great explanation of the different variables.
The Reference also contains a lot of great information about how to use Arduino libraries. For most libraries the Reference is the right place to start. Occasionally you may come across AVR libraries, the reference material for these can usually be found by Google.
Chris discovered the freedom that embedded systems programming (such as programming an Arduino) gives you while he was studying at university. Programming an Arduino lets you break so many of the rules that are in place when programming a computer.