Figuring out which Raspberry Pi you’re looking at can be confusing. At least that’s how I felt when I was in the shop examining the board I was given to see if it was the Raspberry Pi I was looking for. I put together this list to help anyone in the same situation – or who may not have access to the board itself – to figure out which Raspberry Pi they are working with.
Each Raspberry Pi can be identified by its family (1-4, 400, Zero, Pico) and its model name (A, B, A+, B+). Model names indicate whether the board has Ethernet (A means no Ethernet), and if the board is an improvement on a previous one (adding a + indicates an improved version of the same model). Each model can also have different amounts of memory.
This guide looks at how to figure out the Raspberry Pi family and model number using the terminal, by identifying the processor model, by counting the number of peripherals, or by measuring the size of the board itself.
1. Display model name from terminal
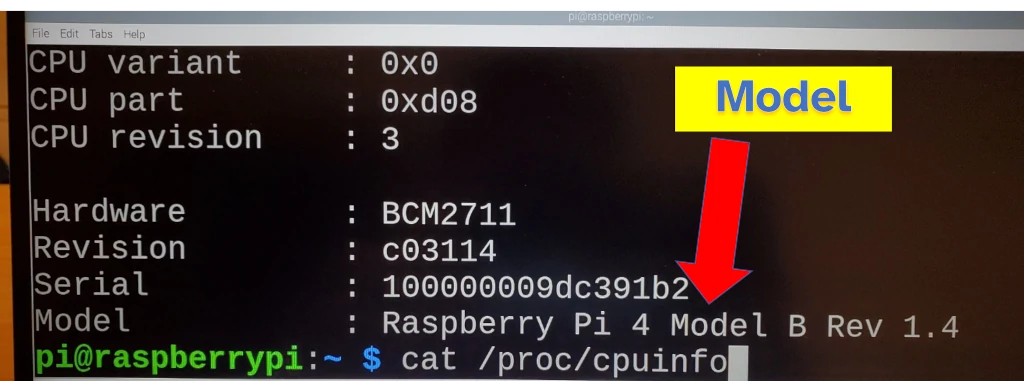
The terminal can display which model of Raspberry Pi is currently in use, including the name of the family and the version.
To have the terminal display the model of Raspberry Pi:
- Open the terminal
- Enter the command:
cat /sys/firmware/devicetree/base/model - Read the Raspberry Pi model number

Quick hint from my lessons learnt: Press the tab key to autocomplete a word after typing a few letters. If there is more than one option, try typing another letter then tab again, or keep pressing tab to cycle through the options.
What this command is doing is reading from a special file that the operating system keeps about the hardware that it’s running on. The cat command reads this file and displays it in the terminal.
An alternative command which also prints the Raspberry Pi version is (also entered into terminal):
cat /proc/cpuinfo
This command lists out details about the CPU, which on Raspberry Pi boards includes the model of the Raspberry Pi.
I tested these commands on the Raspberry Pi OS, but they should work on other Linux versions that give you access to the terminal (particularly the /proc/cpuinfo one).
If you’re interested in more things that can be done from the terminal, check out my guide on how to install a bunch of databases (like SQLite and MariaDB) here: chipwired.com/databases-for-raspberry-pi
2. Read the processor label on board
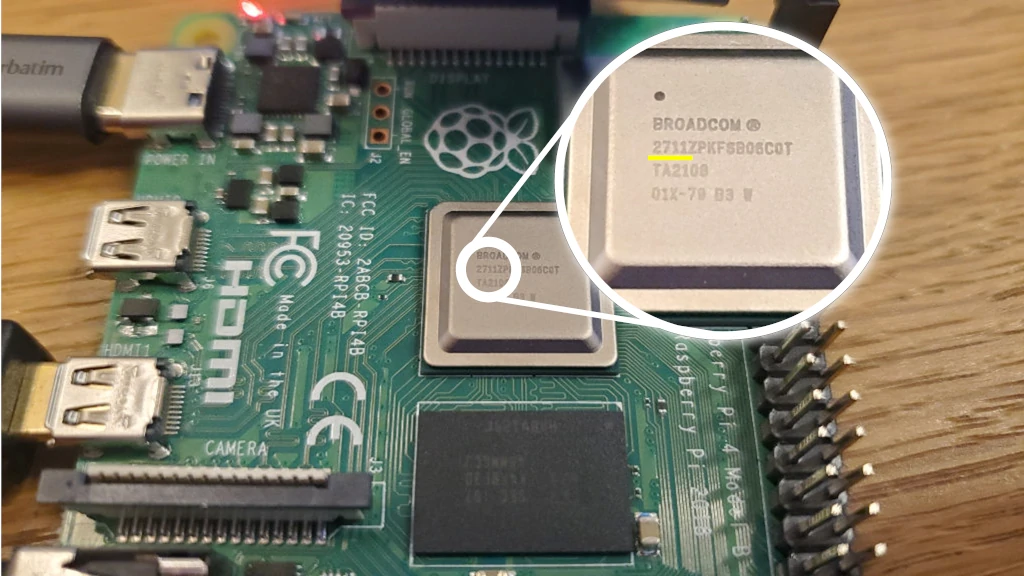
At the heart of every Raspberry Pi is the microprocessor responsible for running the all the programs and apps. Each family of Raspberry Pi uses a different processor.
The processor model, printed on top of the chip, can be a quick way to identify the family of Raspberry Pi. Each model of processor can be identified by reading the first set of letters and numbers after the Broadcom mark (see photo and table below – your Raspberry Pi might also have BCM as part of the prefix to the label).

A list of Raspberry Pi processor labels is in the table below:
| Raspberry Pi Family | Processor Label |
|---|---|
| RPi 4 and 400 | 2711 |
| RPi 3 | 2837 |
| RPi 2 | 2836 or 2837 |
| RPi (1) | 2835 |
| RPi Zero | 2835 |
| RPi Pico | Raspberry Pi logo |
Raspberry Pi 4 and Raspberry Pi 400 should be able to be differentiated by the presence of the keyboard for the 400. On the inside, the Raspberry Pi 400 is pretty much a Raspberry Pi 4 with 4GB of memory (and one less USB port).
3. Count the connectors on the board
Different Raspberry Pi models have a different number of connectors (USB, HDMI etc.).
A few easy ways to tell models apart by connector type:
- Ethernet is only present on Raspberry Pi “B” models, “A” models do not come with Ethernet
- HDMI is used for Raspberry Pi families 1-3, while HDMI micro is used for Raspberry Pi 4 and 400, and HDMI mini is used for the Raspberry Pi Zero. The Raspberry Pi Pico does not have HDMI.
- USB connectors are available on most Raspberry Pi boards, typically there are 1, 2, or 4 connectors (see table below)
The below table lists out the number of USB connectors for each model of Raspberry Pi:
| Model | USB Connectors |
|---|---|
| RPi 4 Model B | 4 (+1 USB-C for power only) |
| RPi 400 | 3 (+1 USB-C for power only) |
| RPi 3 Model B+ | 4 |
| RPi 3 Model A+ | 1 |
| RPi 3 Model B | 4 |
| RPi 2 Model B | 4 |
| RPi 1 Model B+ | 4 |
| RPi 1 Model A+ | 1 |
| RPi 1 Model B | 2 |
| RPi 1 Model A | 1 |
| RPi Pico | 0 |
| RPi Zero | 1 (micro USB) |
A Raspberry Pi 4 board will have 4 USB connector plus an additional USB-C connector. The USB-C connector is only for power though, it does not work with any USB-C device (I’ve tried keyboards, mouse, a USB-C hub, and even a screen – nothing will work in this USB-C connector).
I ensured this list was complete using the official Raspberry Pi tech specs: RPi 4 Model B; RPi 400; RPi 3 Model B+; RPi 3 Model A+; RPi 3 Model B; RPi 1 Model B+; RPi 1 Model A+; RPi Zero.
An additional connector available on Raspberry Pi models – the GPIO – can be used to connect sensors for collecting data (a common model for Raspberry Pi projects). I wrote a whole guide about how to collect data using Raspberry Pi, check it out here: chipwired.com/collect-data-with-raspberry-pi
4. Read model name from board
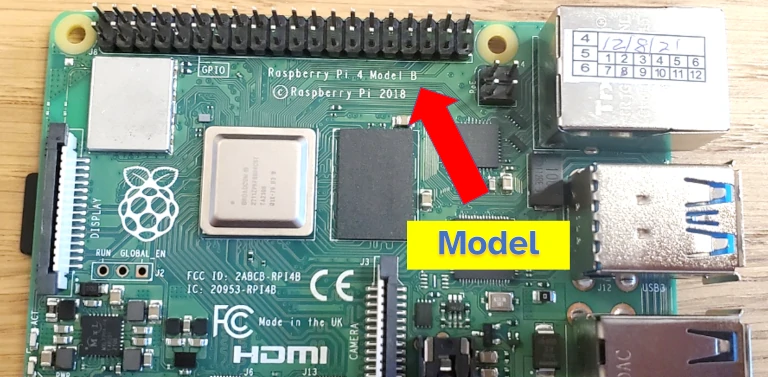
Every Raspberry Pi I’ve seen has the family and model name printed on the board itself. The name will typically be printed on the front of the board.

Note that the copyright year doesn’t reflect the board year; the board in the picture was manufactured after 2019 (the shop I bought it from even marked the purchase date – see the sticker on top of the Ethernet connector).
5. Check the dimensions of the board
Raspberry Pi are typically about 5.6cm (2.2inch) wide and 6.5-8.5cm (2.5-3.4inch) long. This corresponds to roughly 2.2 inches wide and 2.5-3.4 inches long. The smallest Raspberry Pi is the Pico which is about 5cm by 2cm.
The length and width of Raspberry Pi boards is listed in the table below:
| Model | Length | Width |
|---|---|---|
| RPi 4 Model B | 8.5cm / 3.4in | 5.6cm / 2.2in |
| RPi 400 | 28.6cm / 11.2in | 11.3cm / 4.4in |
| RPi 3 Model B+ | 8.5cm / 3.4in | 5.6cm / 2.2in |
| RPi 3 Model A+ | 6.5cm / 2.5in | 5.6cm / 2.2in |
| RPi 3 Model B | 8.5cm / 3.4in | 5.6cm / 2.2in |
| RPi 2 Model B | 8.5cm / 3.4in | 5.6cm / 2.2in |
| RPi 1 Model B+ | 8.5cm / 3.4in | 5.6cm / 2.2in |
| RPi 1 Model A+ | 6.5cm / 2.5in | 5.6cm / 2.2in |
| RPi 1 Model B | 8.5cm / 3.4in | 5.6cm / 2.2in |
| RPi 1 Model A | 8.5cm / 3.4in | 5.6cm / 2.2in |
| RPi Pico | 5.1cm / 2in | 2.1cm / 0.8in |
| RPi Zero | 6.5cm / 2.6in | 3.0cm / 1.2in |
I found Raspberry Pi fairly consistent at keeping to the same board footprint throughout the various models.
6. Look at the chip configuration
Some Raspberry Pi models within the same family can have a different layout of chips on the front of the board.
For example, the difference between the Raspberry Pi 4 (4GB) and the Raspberry Pi 4 (8GB) is the presence of this VLI chip (see photo below). On the 8gb model, this chip was removed.
Chris is fascinated by the amount of power that can be found in such a compact package. Even though he has many years of experience working with embedded electronics and tiny computers, he still faced some challenges (such as identifying which board he was buying!) when he first started out with Raspberry Pi
