Collecting data is fundamental to many uses of a Raspberry Pi. As part of my objective of finding the best ways to analyse and use data on a Raspberry Pi, I put together this list to give you an idea of the variety of ways a Raspberry Pi can collect data.
A Raspberry Pi can collect data using sensors connected directly to its GPIO. It can also collect data from other devices by receiving that data using WiFi, Bluetooth, or over USB. The Raspberry Pi supports a variety of protocols to communicate this data collection over, including MQTT and HTTP, which also allows the Raspberry Pi to use the internet for data collection.
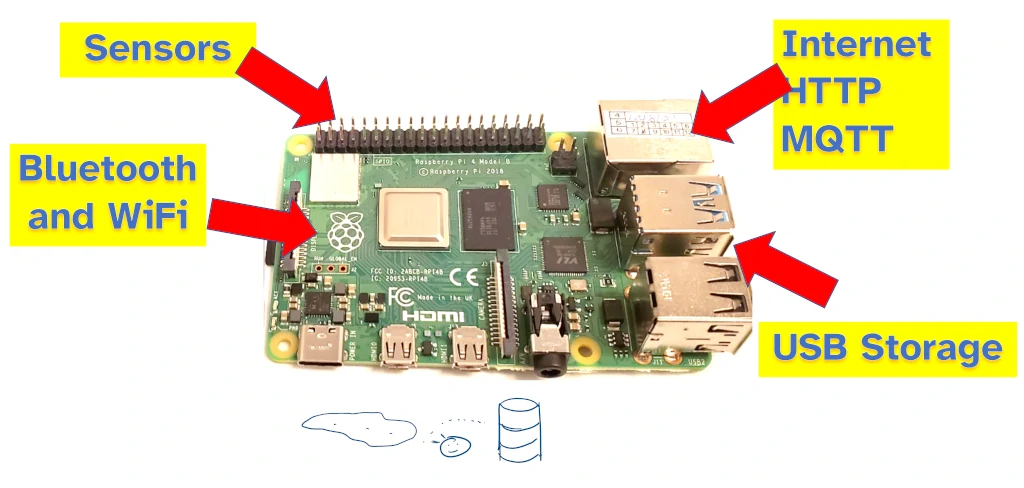
In this guide I’ve looked at how a Raspberry Pi can collect data using:
- Sensors connected directly to the GPIO
- Other devices, which communicate their data back to the Raspberry Pi using various protocols (MQTT, HTTP), and using communication networks the Raspberry Pi can participate in (WiFi, Bluetooth, USB)
- Remote data sources, including over the internet or via USB storage
1. Connecting a sensor
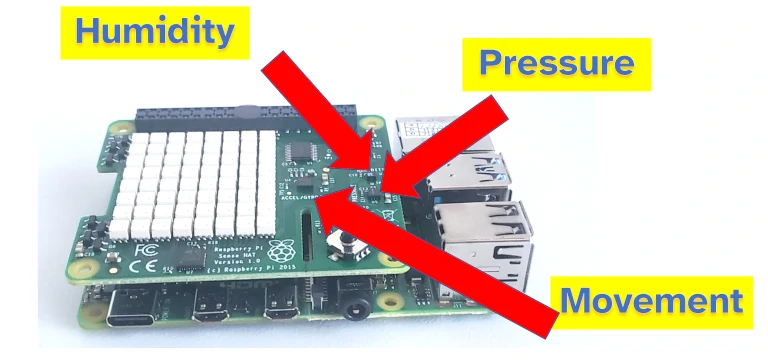
Raspberry Pi is designed to collect data from sensors. The GPIO offers an easy interface that a sensor can be connected to so that the sensor’s data can be collected by the Raspberry Pi.
Sensors that can be connected to a Raspberry Pi include:
- Temperature, humidity, and air pressure
- Tilt, gravity, and acceleration
- Touch and proximity
Sensors can be connected to a Raspberry Pi using its I2C, SPI, or UART pins on the GPIO. The exact pins to connect to can be found here. I wrote a full guide on how to connect a sensor to a Raspberry Pi, check it out here: chipwired.com/connect-sensors-raspberry-pi.
Once connected, the relevant pins will need to be setup in code before the sensor can start sending data. Data received from the sensor can be stored in a a file or database on the Raspberry Pi.
To collect sensor data with a Raspberry Pi:
- Ensure you are using a sensor that has an I2C, SPI, or UART interface
- Connect the sensor to the appropriate pins on the Raspberry Pi (list of pins can be found here)
- Write code to import the library corresponding to the interface, and then use that interface to read the sensor data
After reading the sensor data, the code can take an immediate action (e.g. if temperature >26 degrees, activate air conditioning) or store the data for later analysis.
Interested in saving your sensor data to the cloud? I wrote a guide about different cloud services that Raspberry Pi can connect to, check it out here: chipwired.com/cloud-connections-raspberry-pi
2. Using MQTT
MQTT is a communication protocol for sending small amounts of data over unreliable connections. This makes it a great way for a Raspberry Pi to receive data from devices which may not have a reliable connection to the Raspberry Pi – such as remote sensors.
I wrote a guide on dozens of sensors that can be connected to an Arduino, which can then send that data back to a Raspberry Pi using MQTT. If you’re interested in that guide to sensors, check it out here: chipwired.com/arduino-sensors-uses-costs-connections/
A Raspberry Pi can run an MQTT broker that listens for data sent from the remote device. It can then store this data or pass it on to another app (such as a dashboard system) for analysis and use. The frequency with which data is received from the remote sensor can vary, it’s not as frequent as if the sensor was connected directly to the Raspberry Pi.
To collect data using MQTT and a Raspberry Pi:
- Install an MQTT broker/server on a Raspberry Pi (directions can be found here) and start the server
- Setup the remote device to use MQTT
- Connect the devices to the same network (this can be WiFi, Ethernet, or even over the internet)
- Start sending data from the remote device using MQTT
The remote device needs to be connected to the same network as the Raspberry Pi. This connection can be made using WiFi, Ethernet, the internet or even a protocol such as Zigbee (I once built a remote power sensor using Zigbee that sent its data back to a computer).
After receiving data via MQTT, it must be sent to another app for use. This is typically your own Python app which can be used to take action on the data, or stored for later use and analysis.
3. From a Bluetooth connection
Bluetooth can be used to establish a network between devices allowing them to transmit small amounts of data, such as sensor measurements, for collection by a Raspberry Pi. The Raspberry Pi can establish the Bluetooth network which other devices can connect to and send their data to the Raspberry Pi.
Raspberry Pi supports Bluetooth Low Energy, a standard within Bluetooth for connecting low-powered devices and transmitting small amounts of data. Such devices can include an Arduino which has sensors collected to gather data, and can then send this data back to the Raspberry Pi.
I’ve found it difficult to setup a Raspberry Pi to allow your apps to receive data over the Bluetooth interface. You may have to configure Bluetooth files in a way that specifically depends on the operating system you installed on your Raspberry Pi.
In general, the steps for establishing a Bluetooth connection for collecting data are:
- Configure the Raspberry Pi to use BLE
- Import the BLE library into your app (Python makes this easy)
- Establish the BLE connection with the remote device
- Receive data into your app
Your app can then either use the data immediately or store it for later use.
More detail on how to configure the Raspberry Pi for BLE, and how to use this BLE network in Python, can be found here.
4. From USB input
The USB ports on a Raspberry Pi can be used to collect data from connected devices. Devices can connect to the Raspberry Pi’s USB ports and then apps on the Raspberry Pi can read data from the device.
Using a Raspberry Pi’s USB ports can be useful for collecting:
- Audio data, such as by using a microphone or an ultrasonic device
- Sensor data where the sensor has a USB interface
- Feedback data from another device that uses a USB interface
- USB serial data, from devices that use USB as a serial communication
For reading audio data from the USB, check out the PyAudio Python library. It allows you to read the incoming audio data from a microphone connected to the USB port on the Raspberry Pi. To set it up, there’s a guide here.
For reading USB serial data from a device connected to the Raspberry Pi, a Python app can use the serial library to access the data. The serial library can establish the communication with the connected device and then read the data as it comes through. I found the information here to be helpful in setting up a Python app to read serial data.
For reading from a device, whether that be a sensor or feedback data, the way to communicate will depend on the device. This might involve a custom app produced by that device, or it might involve using the serial library I mentioned above. Check with the device’s manual or data sheet for details.
Once your app has read the data, it can be stored or analysed for use.
5. As an HTTP server
By establishing itself as an HTTP server, a Raspberry Pi can collect data that other devices send to it. A server program is run on the Raspberry Pi, other devices connect to the server and upload their data.
Running an HTTP server on your Raspberry Pi can be a useful way to collect:
- Data that is sent to your Raspberry Pi over the internet
- App data, when you have an app running on a phone and you want it to send data back to the Raspberry Pi
- Sensor data from sensors connected to the same network, some sensors can send their data using HTTP over Ethernet or WiFi
Running an HTTP server and the associated apps can be more resource-intensive than running say a simple MQTT server, however due to how common it is there are a huge variety of guides available to help you setup an HTTP server and use associated apps to collect and save data. Many cloud-based data storage services are an HTTP server that is configured to receive data over the internet.
To collect data on a Raspberry Pi HTTP server:
- Setup an HTTP server app as an API
- Configure your app to use the data or store the data in a database
- Setup your other device to connect to the Raspberry Pi using HTTP
- Collect the data using your server app
I found a really comprehensive guide on how to do this with Python and Raspberry Pi here.
6. From USB storage
A Raspberry Pi can collect data that has been stored on a USB flash drive, or an SD card (connected to a USB reader). Files saved on USB storage can be opened by apps on the Raspberry Pi and have the stored data collected and used.
Collecting data from USB storage can be useful for:
- Very remote sensor data, such as a USB drive connected to a remote weather station and you have to collect that USB drive manually
- Any data where frequency of the analysis isn’t important (such as data that is only used annually)
- High storage capacity, such as video data that is saved to USB storage for later analysis
I’ve found many devices which can write their logs and data to USB storage – this storage can then be read by the Raspberry Pi such that the Raspberry Pi can collect that data for analysis and use. Typically this data is stored as a .csv file, .xlsx file, or in an XML format. These formats can be read by a Python app.
To collect data from a USB storage device connected to a Raspberry Pi:
- Connect the USB storage device to the Raspberry Pi (if your data is on an SD card, you will need to use an SD card reader)
- Find the path of the USB storage in the Terminal
- Use the open() function in Python to open the file from the path
A guide for finding the path can be found here. In short, you need to use the lsblk command in the terminal to list the storage devices, then identify which one is your USB storage device. You can also mount the USB storage device to a predictable location using this guide.
7. From the internet
A vast number of data sources are available on the internet for a Raspberry Pi to collect data from. Many organisations, including all levels of government, have open data sets that a Raspberry Pi can read from (using its WiFi or Ethernet capabilities) and then store locally for use or analysis.
Some useful examples of a Raspberry Pi collecting data from the internet:
- Weather warnings from the local weather bureau, a Raspberry Pi can receive these warnings and turn them into actions around the home
- Public transport data, a Raspberry Pi can collect the data of the next train arrival time and analyse it over weeks to determine how reliable it is (and how much buffer time you should allow if looking to catch one)
- Read data from the UK’s Companies House to analyse insolvency data for thousands of companies
I’ve found endless amounts of data available on the internet for free that you can access, collect to your Raspberry Pi, and then use for analysis and action.
Most of this data is available using the host’s API (Application Programming Interface). A Raspberry Pi can connect to the host using its API and request data. The host responds with that data.
To collect data from the internet using a Raspberry Pi:
- Identify an API you would like to retrieve data from (try googling a service with “API” in the search term)
- Identify the type of API so that you can find the relevant Python module to connect to it (usually APIs accessible over the internet a “REST” APIs)
- Install and include the Python module and access the API (check out the guide here if it is a REST API)
- Use the data in your app or save it for later analysis
The other type of API commonly found is called a “graph” API. These are a little more complicated to use and depends on the host of the API – if you know you want to use a graph API, look for instructions from the host about how to connect to it to collect data.
Chris has been experimenting with software, APIs, and collecting data from electronics for decades. He shares his experience and research with the aim of helping others improve their projects, their environment, and their lives with good data.