Remote monitoring a Raspberry Pi can give you important information about what your Raspberry Pi is doing and whether there is something wrong that needs fixing. I like to know what condition my Raspberry Pi is in, whether there’s a bug in the code I’m getting it to run, or if something else isn’t working properly.
A Raspberry Pi can be monitored remotely using the Linux Dash dashboard, by setting up a ping to check on the Raspberry Pi, or by using SSH to connect to the Pi and then running the top command. These tools allow the Raspberry Pi to be monitored over WiFi, Ethernet, or even over the internet when combined with a public IP and appropriate port forwarding.
This guide includes 7 tools that you can install and run on your Raspberry Pi, as well as how to use them.
1. Display a performance dashboard with Linux Dash
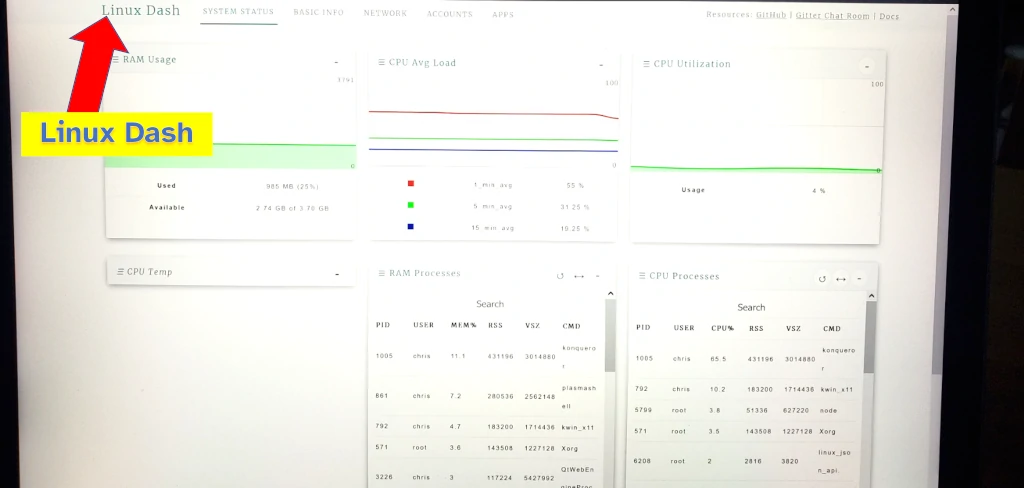
Linux Dash is a simple web-based dashboard that displays the performance status of the device it’s running on, such as a Raspberry Pi. Being web-based, any computer with a web browser can view the dashboard to monitor how the device is running. This means you can view the performance of your Raspberry Pi remotely.
Monitoring with Linux Dash is food for projects where:
- The Raspberry Pi is installed somewhere difficult to reach, but on the same network (e.g. a home weather station);
- When you need to know if the Raspberry Pi ever has any downtime (such as running on an unreliable network connection like 3G)
- If you want to identify which apps are using all the resources on your Pi
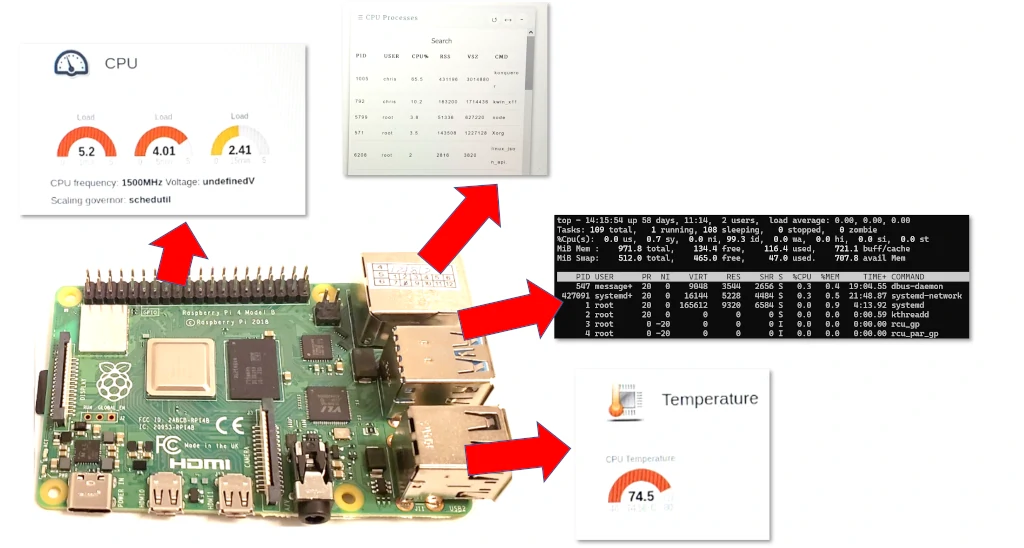
Linux Dash presents you with a dashboard of the Raspberry Pi’s memory usage, CPU load, and running apps. It can also log these over time so you can inspect later to see what was happening.
A Raspberry Pi needs one of the supported languages to be installed to use Linux Dash. These are Javascript (preferred), Go, Python, or PHP. I tested out Linux Dash using JavaScript and Node.js. It also requires a way to download the source code, I used git to do this but curl works as well (according to instructions here).
To install Linux Dash on a Raspberry Pi:
- Open up a terminal and install git using this command:
sudo apt update && sudo apt install git - Install Node.js with this command:
sudo apt install nodejs npm - Download Linux Dash with this command:
git clone --depth 1 https://github.com/afaqurk/linux-dash.git - Change to the server directory with this command:
cd linux-dash/app/server - Run this command to prepare Linux Dash:
npm install --production - Use this command to start Linux Dash:
sudo node index.js
Access the dashboard by opening a web browser and going to http://0.0.0.0 – this address tells the browser to look at the Raspberry Pi itself.
If you’re having trouble with Node.js, Python can also be used to run Linux Dash using this command from the linux-dash-master/app/server folder: sudo python index.py
Any computer on the same network can be used to monitor the Raspberry Pi. To do so, open up a web browser on another computer on the same network as the Raspberry Pi and type in the Raspberry Pi’s IP address. The full process is:
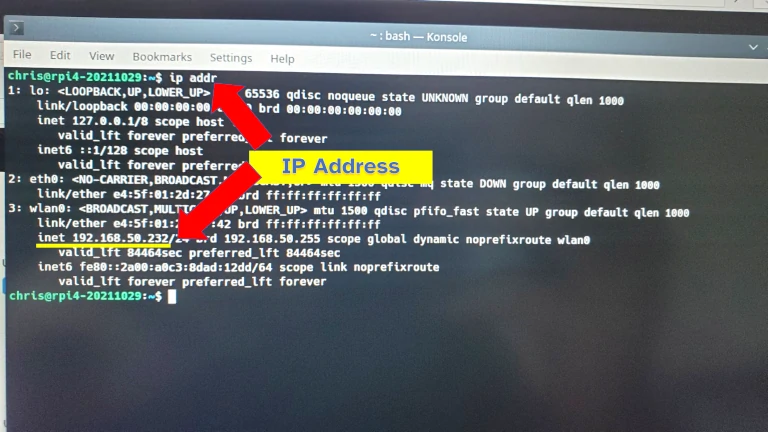
- Find the IP address of the Raspberry Pi by opening a Terminal and entering the command:
ip addr - Look for the inet number under wlan0 (if WiFi) or eth0 (if ethernet)
- Use this address on the other computer to monitor the Raspberry Pi
Interested in building your own dashboard? Check out the guide I wrote here about ways you can display a dashboard on your Raspberry Pi: chipwired.com/raspberry-pi-dashboards/. You can use code to gather your own performance metrics and then publish them using the dashboards I demonstrate in that guide.
2. RPi Monitor dashboard including temperature
RPi-Monitor is a performance monitoring tool design specifically for Raspberry Pi and other embedded computers. It publishes metrics on the performance of its host Raspberry Pi to a web interface. Using this web interface, any computer on the same network can be used to monitor the performance of the Raspberry Pi.
RPi-Monitor is great if you want to:
- See the temperature of your Pi
- Get a nice visual of the CPU or memory load
- See the version of Linux running on the Pi (useful if you’re using alternatives to Raspberry Pi OS)
My Pi was running too hot when I was testing this out. RPi-Monitor showed me that the temperature was too high and I was able to plug a fan in to cool the Raspberry Pi down.

To install RPi-Monitor on a Raspberry Pi:
- Open up a terminal and type this command to install a manager for apt:
sudo apt install dirmngr - Add keys for RPi-Monitor’s repository:
sudo apt-key adv --recv-keys --keyserver keyserver.ubuntu.com 2C0D3C0F - Add the RPi-Monitor repository:
sudo wget http://goo.gl/vewCLL -o /etc/apt/sources.list.d/rpimonitor.list - Install RPi-Monitor with this command:
sudo apt update && sudo apt install rpimonitor - Update RPi-Monitor with this command:
sudo /etc/init.d/rpimonitor update
To test it out, open the web browser on the Raspberry Pi and go to http://localhost:8888 to view the status of your Pi. If you’re having trouble installing RPi-Monitor more detailed instructions can be found here.
To view the dashboard on another computer, find out the Pi’s IP address using the process described earlier in this guide (ip addr command), then open the browser on another computer on the same network and go to http://<IP address>:8888
I found RPi-Monitor looked really good. It also gives some great performance statistics about your Raspberry Pi. A few areas it could improve though are to add auto-refresh to the home page, and a heartbeat to show that the Pi is still running.
3. Using a low frequency Ping
Ping is a utility installed with nearly every common operating system that reports on how long it takes for another computer to be contacted over a network. As the other computer responds to each ‘ping’, the utility can tell you the time taken, and the path with which the two computers communicated over.
Raspberry Pi can respond to ‘pings’. A computer on the same network can ping a Raspberry Pi and the Raspberry Pi will respond. This indicates that the Raspberry Pi is powered on and capable of basic processing.
The downside to using ping is that it can’t tell you much more than that. Ping can only tell you the Raspberry Pi is powered on and that there is some operating system running on it that can handle responses to a ‘ping’. Ping also requires another computer with the ping utility installed (i.e. not a phone), and that utility must be running on the computer to give you the information
Using ping to monitor the status of a Raspberry Pi is good when:
- Your Raspberry Pi is installed somewhere difficult to reach and you want to see if it loses power
- It’s important to know the Raspberry Pi is alive, but you only need to monitor it every now and then (e.g. remote infrequent data collection)
- Making sure there’s no problem with your network
To use ping to monitor a Raspberry Pi, follow these steps:
- Connect a computer to the same network as the Raspberry Pi (WiFi, Ethernet, or VPN)
- On the Raspberry Pi, find the IP address by opening a terminal and typing in:
ip addr - On the computer, open a command prompt (e.g. cmd) or a terminal and type in:
ping ip_addresswhere ip_address is the address of your Raspberry Pi
To have the computer continuously monitor the Raspberry Pi over a long time period, try these commands:
| Windows (open powershell rather than cmd) | while ($true) { Test-Connection <R Pi IP Address> -Count 1 ; Start-Sleep -MilliSeconds 5000 } |
| Linux | ping -i 5 <R Pi IP Address> |
Use CTRL+C when you want to stop these commands running.
4. Monitor over SSH using top
The top utility provides a real-time view of the computer it’s running on. It displays information about the CPU, memory, and the apps running on the computer.
Raspberry Pi supports top. Most operating systems (including Raspberry Pi OS) installed on a Raspberry Pi come with the top utility.
Running top is good for giving you an idea of what apps are running on your Raspberry Pi, how much memory is used, and what the CPU usage is. A text-based interface is used by top, so the command must be run from a terminal window. Unlike the other options on this list, top only works on the Raspberry Pi itself (hence self-monitoring).
Using top on Raspberry is simple:
- Open a Terminal window
- Type top and press enter
I found the display resembles the old Windows task manager – you’re shown a list of apps running on the device, the amount of CPU and memory they consume, as well as some stats about the device itself. It also shows you how long the Raspberry Pi has been on (the number preceding “up”).

Use the arrow keys to move around the interface (more information is available to the right).
It is possible to use top to monitor the Raspberry Pi remotely. To do this:
- Enable SSH on your Raspberry Pi (check out this guide)
- Find the IP address of your Raspberry Pi (use the ip addr command)
- SSH to your Raspberry Pi using this command:
ssh pi@ip_address(if using Raspberry Pi OS) orssh root@ip_address(for other OS) - Run the top command from the command prompt
If you find a lot of programs consuming resources on your Raspberry Pi and you want to stop some of them running, check out the guide I wrote on this here: chipwired.com/stop-program-raspberry-pi
Top can provide a secure way to monitor all this detail on your Raspberry Pi over the internet (unlike the other items on this list so far). You may need to forward an SSH port on your router to your Raspberry Pi if you want to enable SSH access to it over the internet. Check out the guide here if you need help and take note of the caution about security.
5. Setup a web server and use PHPSysInfo
PHPSysInfo is a PHP script that reports system info using a web browser interface. Being PHP, it requires a web server to run the script with the web server taking care of the web-based interface. This has an advantage of being more secure, making it easier to monitor your Raspberry Pi over the internet.
Raspberry Pi can run PHP and therefore PHPSysInfo. It can also run a variety of web servers that work with PHP, including the popular Apache server.
To install PHPSysInfo on a Raspberry Pi:
- Install Apache server and PHP (check out this guide – but skip the “virtual host” step)
- Install PHPSysInfo with this command:
sudo apt install phpsysinfo - Follow the setup instructions
- Open your browser and navigate to http://localhost/phpsysinfo
If everything went according to plan you should be looking at the system info of your Raspberry Pi.
We’ve installed a proper web server that should be secure enough to run over the internet. If you want to monitor your Raspberry Pi over the internet, you may need to forward ports on your router (check out the guide here).
6. Using Raspcontrol
Raspcontrol is a utility like PHPSysInfo but designed with Raspberry Pi in mind. The original version is no longer available, but another community has a copy of the source code available if you want to try.
Check out the instructions here if you want to install Raspcontrol.
The source code seems a bit old with the last update being roughly 6 years ago. Hopefully it still works!
7. Advanced monitoring using SNMP
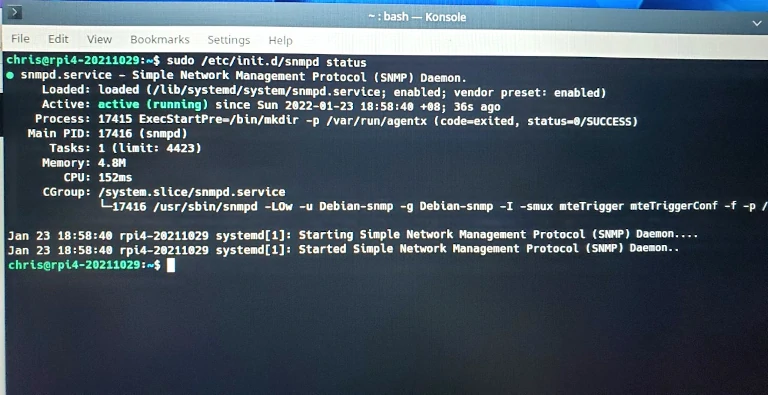
Simple Network Management Protocol (SNMP) is a powerful protocol for monitoring the performance of a device over a network. it gives information about network usage, CPU usage, memory card space, and other performance details about a device. The SNMP program on a Raspberry Pi can make this data available so that another computer on the network can request it to see how the Raspberry Pi is performing.
I found SNMP very hard to setup. It requires downloading and editing custom configuration files and then trying to get all those working without error. Too much for me!
If you want to give it a go, check out the instructions here. For simple Raspberry Pi projects, I can’t see any real advantage of setting up your own SNMP over say Linux Dash.
Chris has been experimenting with different ways to run Linux apps on his Raspberry Pi. These monitoring tools have been a good example of how a Raspberry Pi supports a wide variety of Linux features typically found on large computers and servers.