Cables were not included when I first purchased my Arduino. I had to figure out which cables and wires I needed to program and power my Arduino, connect any shields I wanted to use, and start to build projects. This guide aims to make it easier for you to figure out which cables and wires you need to power, program, and use your Arduino.
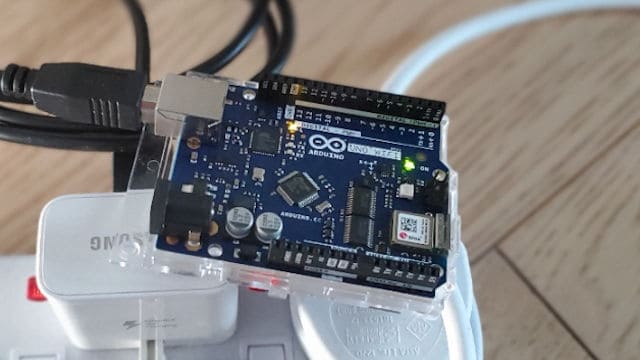
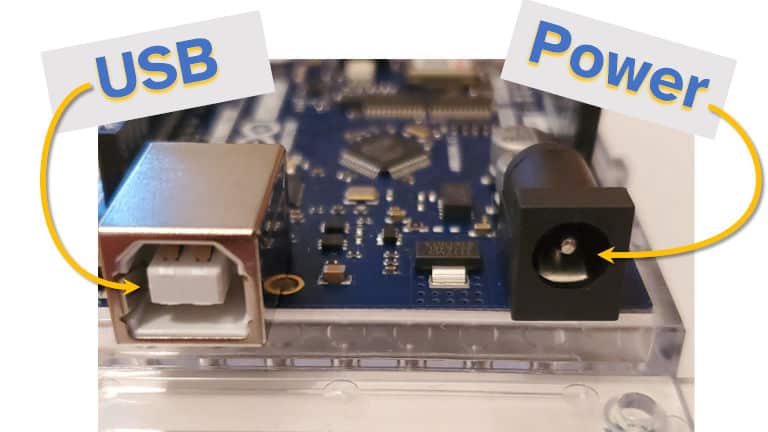
An Arduino typically only requires a USB cable to be used as a power source and to connect to a computer for programming. A USB Type B cable can be used for the most popular Arduino model (Uno), however other Arduino boards may require Type B-mini or micro connectors. A power adapter cable can also be plugged into the Arduino to power the board when separate from a USB power source.
As a general rule, the length of cable used to connect the Arduino should be no longer than 5 meters though it is recommended to keep the cable under 3 meters of length. To power the Arduino over a longer distance a regular AC power cable can be used in conjunction with a suitable power adapter.
When figuring out cables for Arduino, I like to use the “where it fits” rule. This means that if the cable fits then it can be used! Make sure the power adapter has the correct voltage (typically 7-12 volts) when applying this logic however. Also be careful of non-standard USB plugs; while I’ve never seen one that can damage an Arduino, it may be possible if the USB power source isn’t built very well.
I put together this guide to look at what cables are typically required to go with a new Arduino, including getting started with the Arduino and turning it into a project. In this guide I’ve looked at what cables are required for:
- Powering the Arduino (USB cables and printer cables)
- Shields
- Wire types to use with Arduino (particularly breadboards)
The easiest cable for programming the Arduino is the USB cable (it is also possible to program an Arduino wirelessly).
Cables for Powering Arduino
An Arduino can be powered using a USB cable or a power adapter. This part of the guide looks at how to power an Arduino using these methods.
Can Arduino be powered by USB?
An Arduino can be powered from any standard USB power source, including the following:
- Mobile phone charger
- Portable power bank
- Computers and laptops
To power the Arduino using USB, plug in a USB cable to the Arduino with the Type A end plugged into the USB power source. Any standard USB power source can be used including phone chargers, power banks, and computers.
If you’re interested in how much power an Arduino uses, I tested 8 different sketches and a bunch of peripherals to answer exactly that question. Check out the results here: chipwired.com/arduino-power-use
The USB cable should be less than 5m long, however most commercially sold cables already meet this requirement. A suitable USB cable should cost less than $10. If more than 5m of distance is required, consider using a mobile phone charger on the end of a power extension cable, or using a portable source of USB power (such as a battery pack).
Most Arduino starter kits include a USB cable that’s suitable for powering and programming the Arduino. If buying a standalone board (i.e. not in a starter kit), a USB cable can be purchased separately. I typically recommend buying the items separately.
Can a Printer Cable be used for Arduino? A standard USB 1.1/2.0 Type B printer cable can be used for the Arduino Uno. A printer cable will typically not work with the Arduino Nano or other Arduino boards.
The table below summarises which USB cables can be used to power each Arduino:
| Arduino Board | USB Cable Connector |
|---|---|
| Uno | Type B |
| Nano | Mini Type B |
| Due | Micro Type B |
| Mega | Type B |
| Micro | Micro Type B |
A typical printer cable is USB 1.1/2.0 Type B. I used this guide to figure out what sort of USB connectors and cables I needed.
An adapter can be used to convert a USB cable between these types if you don’t have the right cable available or want to share a single cable between multiple Arduino boards.
Still trying to decide which Arduino to buy? Check out my guide here if you want to know more about which Arduino I recommend for beginners and why: chipwired.com/best-arduino-for-beginners/
Power Adapter Cables for Arduino
A power adapter for an Arduino should meet the following requirements:
- 2.1mm inner diameter, 5.5mm outer diameter, with positive tip
- Center positive
- 7V to 12V DC output
This means that the power adapter cable should have the plug on it with the 2.1mm inner diameter, 5.5mm outer diameter, and with positive tip.
The length of the power adapter cable for Arduino should be less than 5m, however any commercially manufactured power adapter will have a cable of suitable length. To power the Arduino over a longer distance, consider plugging the power adapter into an extension cord, or using a portable USB power source.
The basic Arduino starter kit does not include a power adapter, however some of the more advanced educational or engineering starter kits can include one. A power adapter can typically be purchased for less than $10.
The following Arduino boards support using an external power adapter:
- Uno
- Mega
- Due
Other Arduino boards can only be powered from the USB socket. These boards can be powered from a wall socket using a mobile phone charger. In my experience, they can also be powered using a portable battery pack with USB connection.
USB is my preferred way to power an Arduino, even for projects where the board has be left running for a long time.
If you’re interested in different ways you can power an Arduino (including using a solar panel), check out the guide I wrote here: chipwired.com/arduino-power-sources
Cables for Common Shields
An Arduino project that involves shields may need cables for those shields as well.
The table below lists common Arduino shields and the corresponding cables that should be used with them:
| Shield | Cable Requirements |
|---|---|
| Ethernet | Category 5 Ethernet with RJ45 connector |
| Relay | None |
| LCD and displays | None |
| Capacitive touchpads | None |
| CAN-Bus | CAN-bus data cable |
| ProtoShield | Wires, see below |
| Motor | Wires, see below |
I’ve found the CAN-bus cables the most difficult to get – not that they’re hard to purchase, only that they’re more difficult than the others. If you’re planning on using a CAN-bus shield in your project, plan ahead for ordering the cable as it might take some time to arrive (at least in my experience it has).
An Ethernet cable can be up to 100m in length, and this includes if using “Power over Ethernet”. A CAN-bus cable can be up to 250m. For both these cables I would expect the cost to be the reason to use a shorter cable; I haven’t seen many Arduino projects that require more than 50m of Ethernet or CAN-bus cabling.
If you’re interested in more details about the components and shields to use with Arduino, check out my guide here: chipwired.com/useful-arduino-components/
Wires seem to be the most popular way to connect Arduino shields to external circuitry, I’ve gone into more detail on wires below.
Wires to use with Arduino
Typically the most suitable wires to use with an Arduino are single stranded 22AWG or 0.65mm. Single stranded wires are most suited to use with breadboards and prototyping shields. Wires that are to be soldered to another device should be stranded wire of similar gauge.
These wires are often used for developing prototype circuits and projects using a breadboard or prototyping shield. They can also be used to connect external devices, such as motors that use screw terminals.
Listed below are some of the recommended wire gauges to use with Arduino:
| American Wire Gauge | Diameter | Cross sectional area |
|---|---|---|
| 22 | 0.65mm | 0.33mm2 |
| 24 | 0.51mm | 0.20mm2 |
| 26 | 0.40mm | 0.13mm2 |
My preference is to use 0.65mm (22AWG) single-stranded breadboard wire, though it does depend on application. Even though I’ve seen other sites recommend the smaller wires, I’ve never come across a need to use 0.51mm or 0.40mm wire with Arduino.
Wire length should not be more than 30cm, though in some circumstances (such as providing power to low power devices) it may be possible to use longer wires. If sending power, data, or binary signals over a longer distance, consider using a cable with an appropriate protocol for the application (e.g. USB).
Wires typically cost $10 to $20, depending on whether you’re buying a reel or a pre-cut pack. Buying a reel is cheaper but you’ll need to strip the wires yourself; buying a pre-cut pack is more expensive and less flexible (limited to the wire lengths provided) but it saves you from having to strip wires. It took me years to justify buying a wire stripping tool, so I used to do it by hand – it can get frustrating when you make a mistake and chop the end of the wire off instead!
References
While I have a bit of experience working with Arduino, and on electronics projects in general, I did have to look up some details to make sure I was providing a good resource in this guide. These are the list of external resources I used:
- USB cable length limit
- List of popular Arduino shields
- Arduino power requirements
- Arduino power adapter size
- Wires
Chris is an electronics engineer who has been building circuits since secondary school. Recently he’s picked up Arduino and is busy learning all the ins and outs of working with various Arduino boards and shields.