I tested 8 different sketches, a bunch of peripherals, and a variety of measuring tools, all to figure out how much power an Arduino uses.
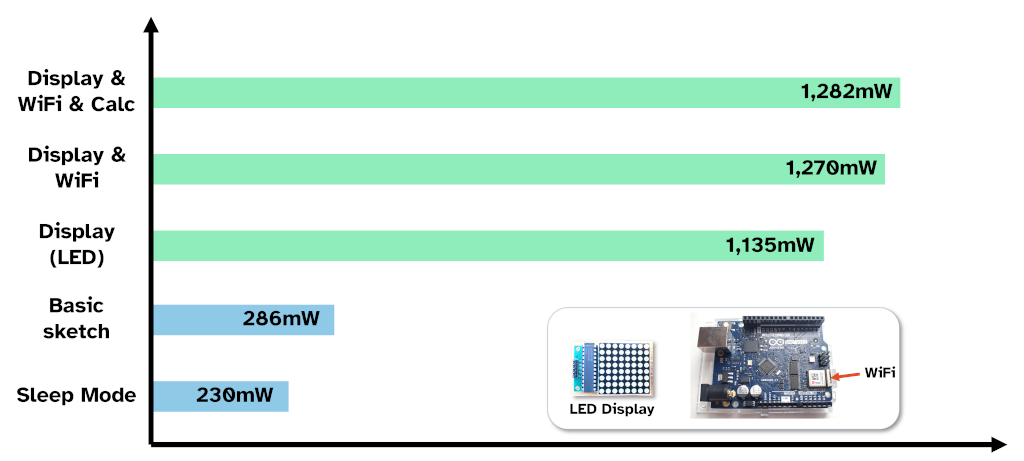
An Arduino typically uses between 286mW and 1,282mW of power when measured at the USB supply point. The higher power draw occurs when the Arduino is powering a display, and using wireless communications such as WiFi or Bluetooth. Lower power draw is achieved by using less code in a sketch, or by having the Arduino enter sleep mode between operations. This was measured as low as 230mW in our experiment.
A summary graph of Arduino power measurements that we took from our experiment is shown below:
Additional measurements in the experiment included how much power the WiFi alone uses (474mW) and how much power the Bluetooth alone uses (459mW). All tests were done with my Arduino UNO WiFi Rev 2, an LED matrix display, two USB power meters, and a watt meter.
Full results and my methodology (how I conducted the tests to get these numbers) are detailed below. I’ve also looked at how you can reduce the power usage of your Arduino project at the end of this guide.
Full Results: How much power an Arduino uses
The table below lists all the Arduino power readings from the experiment:
| Test | Reading (C Tester) | Reading (M Tester) | Reading (Watt meter) |
|---|---|---|---|
| Baseline (Blink) | 398mW | 280mW | 0.4W |
| Low Normal (EEPROM) | 398mW | 286mW | 0.4W |
| Low Low (Sleep) | 347mW | 230mW | 0.3W |
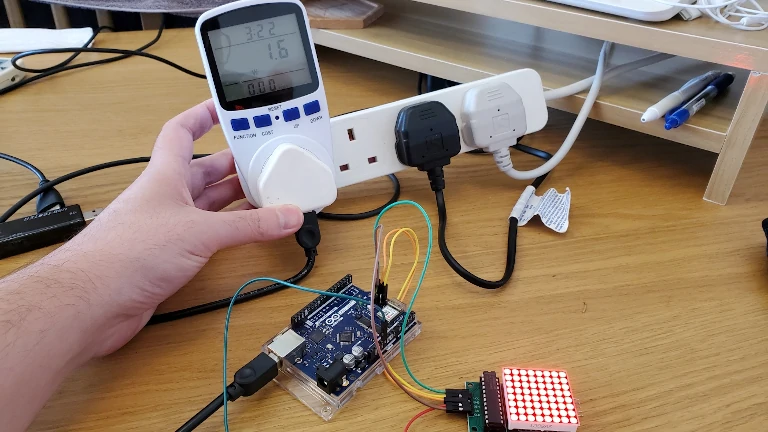
| Medium (LED display) | 1,251mW | 1,135mW | 1.6W |
| Medium Plus (WiFi and LED display) | 1,380mW | 1,270mW | 1.9W |
| High (WiFi, LED display, floating point maths) | 1,407mW | 1,282mW | 1.9W |
| WiFi only | 586mW | 474mW | 0.7W |
| Bluetooth only | 556mW | 459mW | 0.7W |
C Tester is a USB power tester with color display; M Tester is a USB power tester with a monochrome display; and the watt meter is one typically designed for measuring appliance use – which is why it’s less accurate (it’s also measuring power conversion losses from the phone charger I used to power the Arduino). The C Tester also measured 132mW without an Arduino connected – I suspect it’s measuring itself as if we subtract this 132mW from C tester readings, we’re inline with M tester.
The lowest reading I achieved was 230mW of power, corresponding to when the Arduino was asleep. This sleep mode represented a saving of 50mW compared to when the Arduino was awake.
The highest reading I measured was 1,282mW of power (that’s 1.282 watts). This was drawn when the Arduino was using the WiFi, an LED display, and calculating floating point arithmetic in every loop (typically floating point operations are very expensive for a CPU to do – on a big computer we usually outsource this to a graphics card). That said, floating point arithmetic didn’t seem to add much as this was only 12-20mW greater than the test without floating point arithmetic.
WiFi and Bluetooth functions on this Arduino appeared to use approximately the same amount of power: Each using between 459mW and 474mW. Connecting my phone to the Bluetooth, or serving data over the WiFi, increased the power usage by 120mW.
Interestingly, the watt meter seemed to diverge further as the Arduino’s power increased. I suspect this is because of inefficiencies in the AC-DC converter becoming more pronounced as power draw increases. Technically the watt meter is measuring AC-DC converter + Arduino, whereas the USB testers are measuring Arduino only.
I took current readings for some of the tests, these are summarised in the table below:
| Test | Reading (C Tester) | Reading (M Tester) |
|---|---|---|
| Baseline (Blink) | 83mA | 50mA |
| Medium (LED display) | 260mA | 240mA |
| Medium Plus (WiFi and LED display) | 272mA | 250mA |
| High (WiFi, LED display, floating point maths) | 272mA | 240mA |
| WiFi only | 115mA | 90mA |
| Bluetooth only | 109mA | 80mA |
The watt meter did not provide a current reading. The voltage typically varied between 5.05V and 5.11V.
As a sanity check, these results appear to align with other people’s experience such as here (where the Arduino was recorded at 290mW), and here (where the UNO seems to have quite a high current draw compared to other boards). Please let me know if you have more data points on Arduino power draw, I’d love to update this guide with more detail.
Typical costs of powering Arduino
It would cost between 0.13 cents and 0.62 cents per day to run an Arduino, based on the above power measurements and an electricity unit cost of 20 cents per kilowatt-hour. The cheapest case is if the Arduino were in sleep mode for most of the hour, while the most expensive case occurs when the Arduino is required to calculate and serve data over WiFi or Bluetooth.
If the Arduino were powered by a 1000mAh battery, it would last approximately 3.5 hours if the WiFi and an LED display were running. Running a simple sketch without WiFi or peripherals could allow the Arduino to run for approximately 12 hours. This is based on the measurements above and a calculation given that batteries typically output a lower voltage (~4.3V).
Methodology: How I tested Arduino Power Usage
To test Arduino power usage, I followed these steps:
- Upload a sketch to the Arduino
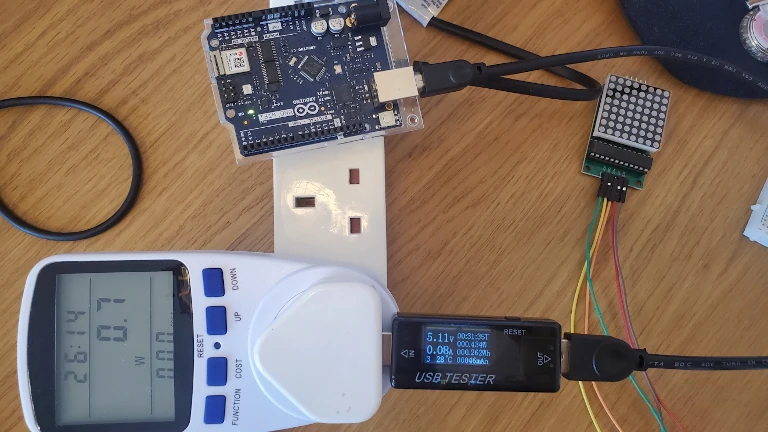
- Unplug the Arduino from the computer and connect it via a power meter to a power source
- Use the sketch (e.g. connect to the WiFi)
- Read the power meter
- Repeat steps 2-4 with another power meter
I didn’t use my computer as the power source because I didn’t trust the circuitry inside the USB power meters that I was using (never plug questionable USB devices into your computer). This is the same reason I used 3 different power meters – they were cheap, having 3 points of data helps overcome some of their inaccuracies.
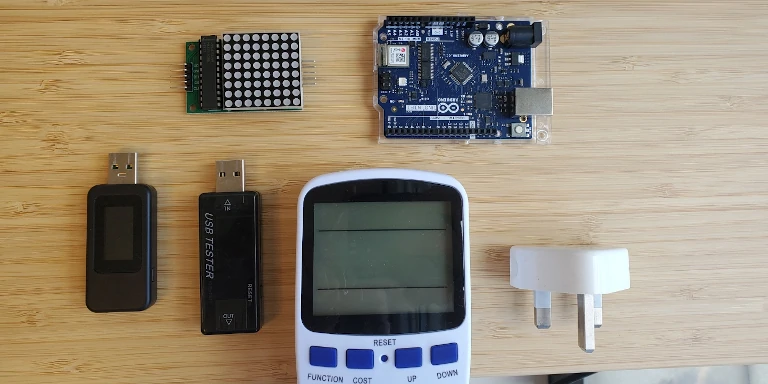
The tools I used for this test were:
- Two different generic USB power meters (like this)
- A generic watt meter (like this)
- An official Apple phone charger (hoping the output power is good quality)
- An Arduino UNO WiFi Rev 2, and an LED matrix display
I ran a variety of sketches with the aim of representing typical use-cases for an Arduino and pushing it to its limits. These are detailed in the table below:
| Test Name | Aim |
|---|---|
| Zero (no Arduino) | To test the meters and see if they reached zero |
| Baseline | Blink sketch to see what a simple Arduino sketch consumes |
| Low (Normal) | Simple but useful sketch that does something (save data to the EEPROM) |
| Low (Low) | Sleep-mode sketch to try to reduce power consumed |
| Medium (Normal) | One connected peripheral (an LED display) |
| Medium (Plus) | One connected peripheral (an LED display) and a WiFi connection |
| High | Communications (WiFi); connected peripheral (an LED display); and a complicated calculation on the Arduino (floating point multiplication in every loop) |
This aimed to cover a range of use cases:
- A simple sketch that reads data and saves it to the Arduino for later (low)
- A sketch that controls a display (medium)
- Pushing the Arduino to its limits (high power and low power)
I also tested a WiFi-only sketch (the simple HTTP server) and a Bluetooth-only sketch (a battery monitor example included with the Arduino BLE library).
Motors were excluded from this experiment. While a motor will significantly increase power draw, the recommended best practice is not to connect it to the Arduino directly. My aim with this experiment is to measure how much power the Arduino itself typically uses.
How to use less power with an Arduino
When putting this experiment together I looked at different ways of maximising the power drawn by Arduino, as well as minimising it – I wanted to see if I could squeeze every efficiency out of an Arduino.
If you’re looking for ways to minimise the amount of power your Arduino is using, try these:
- Choose an Arduino board designed for power saving
- Use the sleep function
- Turn off peripherals when not in use
Choosing the right Arduino is important if you need to save power in your project. Typically the MKR family uses less power than other Arduino boards thanks to its lower operating voltage and more power efficient design (a sacrifice in the amount of compatibility the board has).
Using the sleep function allows you to command the Arduino to use less power at certain points within a sketch. Depending on your Arduino board, it can be configured to wake up after a set time, or based on an external factor (like receiving an input). I accidentally put my Arduino to sleep indefinitely when I tried to get this working though I was still able to reset it (if you need help resetting your Arduino, check out my guide here: chipwired.com/5-simple-ways-to-reset-arduino). If you have an MKR family board and want to know more about putting it to sleep, check out the Arduino reference here.
Turning off peripherals when not in use is another big power saver. From this experiment I saw that a small LED matrix display consumed over 700mW of power. If that could be turned off periodically, such as when it’s unlikely to be needed, that would save a lot of power. Each peripheral has a different way of turning it off, in the case of the display I was using there was a command I could sent to it over the SPI connection to instruct it to turn all segments of the display off. I could also adjust the brightness if I needed to save power while still having the display turned on.
Next Steps
Want to know more about Arduino? I’ve put together a growing number of guides on this site to help you out, such as:
- Which cables to use with an Arduino (for USB, power, and connecting components): chipwired.com/arduino-cables-and-wires
- How to make money with Arduino (e.g. collecting data to sell): chipwired.com/make-money-with-arduino
- Useful components that you can buy to work with a variety of projects: chipwired.com/useful-arduino-components
- Which stores are best to buy them from (Jameco and RS are typically quite good): chipwired.com/arduino-component-shops
If you want to replicate my experiment, here are the tools I used:
- USB power meter
- Watt meter
- Jumper wires like this
The above are affiliate links which earn a commission if used to purchase an item.
Chris called on some of the skills he hasn’t touched since doing electrical labs at uni to complete this article. Thankfully this one was much more fun!