When I first started with Arduino, choosing which Arduino to buy was really tough. There were a lot of choices and I didn’t know which model I should buy.
This guide is intended to help beginners figure out which Arduino model to buy. I’ve compared 8 Arduino boards in this guide to help you pick the right one to start with.
The best Arduino model for beginners is the Arduino UNO Rev 3, costing approximately $23 to $25. Beginners can also consider the MKR WiFi 1010 which includes WiFi and Bluetooth connectivity for $32. Additional components and cables will need to be purchased to build a first project using these boards, expect to spend $10 to $20 on such items.
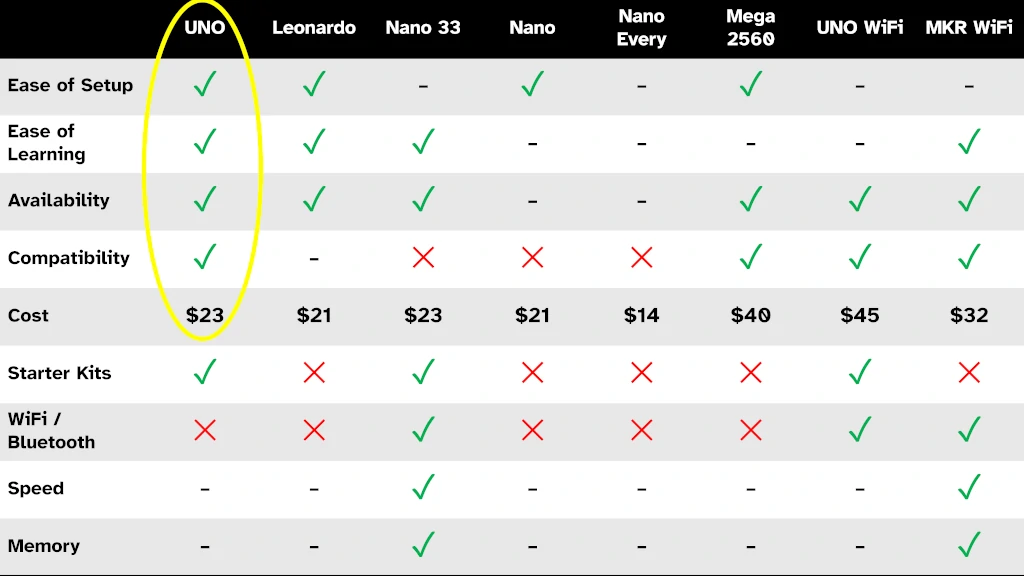
When recommending an Arduino board for beginners, I typically consider the following criteria:
- How easy the board is to setup;
- How easy the board is to learn;
- Is the board available to buy from stores;
- How compatible is the board with Arduino shields;
- How much does it cost;
- What are the options for starter kits;
- Does the board have WiFi and Bluetooth;
- How fast is the board;
- How much memory does the board have.
I’ve gone into more detail on each of these below to help any beginner choose the right Arduino.
Also included at the end of this guide is things you should avoid when buying your first Arduino (such as the VIDOR – don’t spend money on this unless you are absolutely sure your project needs it!).
Most Arduino packages do not include cables or components! If you’re not sure what to buy when getting started with Arduino, check out my guide here: chipwired.com/new-arduino-buyers-guide/
Easy to setup
Some Arduino models have more steps involved in getting them setup. Arduino provides guides on how to setup each of their boards. While all boards have guides available, some are more beginner friendly.
The simplest Arduino models to first setup are:
- UNO
- Nano
- Leonardo
- Mega 2560
The other boards I compared have some additional steps required in setting them up (neglecting one of these steps caused me a headache when setting up my UNO WiFi Rev 2).
Despite these extra steps, the Arduino guide makes it easy. Any board which Arduino has a guide for is easy to setup. If you’re interested in the guides, here are the links to each one: UNO, Leonardo, Nano 33, Nano, Nano Every, Mega 2560, UNO WiFi Rev 2, MKR WiFi 1010.
The UNO setup guide also includes some troubleshooting steps for anyone who might get stuck with the setup process.
Easy to learn
I looked at how easy it is for a beginner to learn Arduino, and how easy it is for a beginner to learn about each of these boards.
Resources to help learn Arduino when first getting started include:
- Tutorials and instructions on learning about a particular board;
- Guides on how to learn Arduino, or programming in general; and
- Project examples
After using a few of these, I found that for beginners:
- UNO has great learning material available that is produced by third parties (such as on Youtube);
- MKR WiFi 1010 and Nano 33 have decent official tutorials on the Arduino website;
- Project examples are widely available for all boards.
The UNO is overall the easiest board to learn, and to use as a tool to learn about Arduino, programming, and embedded devices. The MKR WiFi 1010 also has great material out there to help you learn.
Availability to buy
Arduino models can occasionally be hard to find in store. This can be due to popular models selling out before production can catch up, or due to Arduino discontinuing certain models (sometimes even despite their popularity).
I looked at various stores selling Arduino and found the following models were easy to find, in stock, and ready to ship:
- UNO
- MKR WiFi 1010
- Leonardo
- Mega 2560
- UNO WiFi Rev 2
The Nano 33 was also somewhat easy to find, however the original Nano and the Nano Every weren’t as easy.
I wrote a whole guide on where to buy Arduino online, including parts and components to help build a project. Check it out here: chipwired.com/arduino-component-shops/
If you’re interested in how the UNO stacks up specifically against the Mega, MKR, and others on this list, I wrote a whole guide to that here: chipwired.com/arduino-uno-comparison-guide/
Compatibility
I’ve often found beginners overwhelmed with the selection and use of shields when first starting out with Arduino. Shields are designed to augment Arduino boards with specific functions that can be used as a quick way to solve a problem when building a project. Examples of shields include adding WiFi or Bluetooth, adding relays, controlling motors (which would otherwise draw too much current through the Arduino), adding Ethernet etc.
Arduino shields have varying compatibility with the various Arduino models. This is due to:
- Some Arduino boards operate at 5V and others operate at 3.3V
- Some Arduino boards have a larger layout and some have smaller layout
- Even within the same layout, different Arduino models can have different pin arrangements
I found the following boards to have good shield compatibility (it’s easier to find shields for these):
- UNO Rev 3 – 5V, normal size – easy to find shields
- UNO WiFi Rev 2 – 5V, normal size – easy to find shields
- MKR WiFi 1010 – 3.3V, normal size – easy to find shields
- Mega 2560 – 5V, large size – easy to find shields
The other models are a little bit harder to find shields for:
- Leonardo – 5V, normal size – requires extra work to get UNO shields working with the Leonardo due to a different pin layout
- Nano 33 / Nano / Nano Every – 5V, small size – a little harder to find shields as they need to be compatible with the smaller size
Cost
A cost comparison of Arduino models for beginners is included in the table below:
| Board | Cost (approx) |
|---|---|
| UNO Rev 3 | $23 |
| Leonardo | $21 |
| Nano 33 | $23 |
| Nano | $21 |
| Nano Every | $14 |
| Mega 2560 | $40 |
| UNO WiFi Rev 2 | $45 |
| MKR WiFi 1010 | $32 |
For beginners looking to explore Arduino, I recommend spending the money on the Arduino UNO or the MKR WiFi 1010.
If you’re considering saving money by getting a Nano series board, these sacrifice shield compatibility to save cost. In the case of the Nano and Nano Every, they also do not come with WiFi and Bluetooth (which the Nano 33 can come with). If you know your project will only use the features of these cheaper boards (e.g. a wearables project), then do consider one of these cheaper models.
All models will require extra parts and components to be purchased to build a useful project. Expect to pay an additional $10 – $20 in parts and components to build useful projects with Arduino. I wrote a guide to what these parts and components are, and how you can expect to spend, here: chipwired.com/arduino-cost-guide/
Starter Kits
Starter kits offer all the necessary parts to build a set number of projects. These kits include the instructions, components, and often an Arduino itself. I’ve found starter kits to be a great way for beginners – particularly those unsure about coding or electronics – to start learning Arduino.
There are only 3 Arduino boards that can be found in starter kits:
- UNO Rev 3, whose starter kit costs $92
- Nano 33, whose starter kit costs $50
- UNO WiFi Rev 2, whose starter kit costs $68.12
If you want to learn about electronics, embedded systems, programming, and Arduino – a starter kit is a great choice! By including step by step instructions, and all the components necessary for starter projects, the kits can walk you through a series of learning steps helping you to start exploring Arduino projects. If you’re interested in seeing how the various starter kits are worth it, I included starter kits in my Arduino cost comparison guide, which can be found here: chipwired.com/arduino-cost-guide/
Arduino boards can easily be bought without a starter kit however. I still recommend the MKR WiFi 1010 for beginners despite its lack of starter kit.
You can also save money by not buying a starter kit. Instead, if you decide what sort of project you want to build, and buy only the components for that project from online stores, you can save money compared to buying a full kit. I’ve often seen though that people buy the wrong components (typically incompatible with their project) when buying online. As long as the components aren’t too expensive (e.g. a $10 LCD display), it can still be cheaper to take it on the chin as a lesson learnt if you end up buying the wrong component.
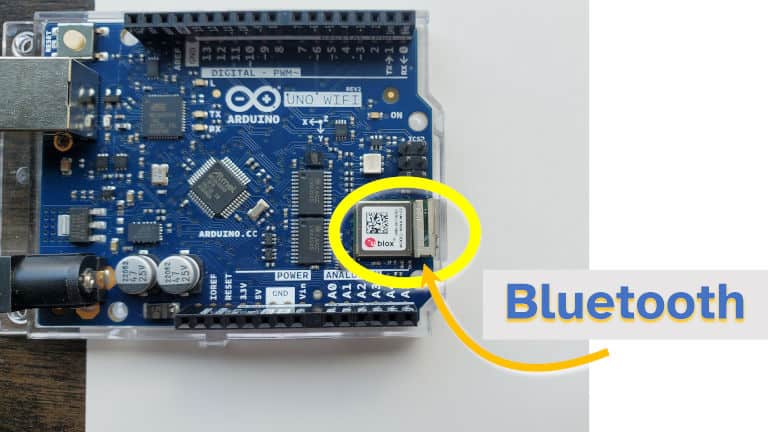
WiFi and Bluetooth
Not all Arduino boards come with WiFi and Bluetooth built in.
If you’re even considering a project which may use WiFi or Bluetooth, consider buying one of the beginner boards that includes WiFi and Bluetooth.
Beginner friendly Arduino models which include WiFi and Bluetooth are:
- Nano 33
- UNO WiFi Rev 2
- MKR WiFi 1010
There are other Arduino models out there with WiFi and Bluetooth, though I’ve found these three boards to be the most beginner friendly.
WiFi and Bluetooth can also be added to other Arduino models using a shield.
I have guides to which Arduino models come with Bluetooth and WiFi, and how to use a shield to add it to those which don’t:
- My guide to Bluetooth on Arduino: chipwired.com/arduino-board-wifi-guide/
- My guide to WiFi on Arduino: chipwired.com/arduino-bluetooth-built-in/
Speed
The fastest Arduino on our beginner-friendly list is the Nano 33 with a processor speed of 64 MHz. This is closely followed by the MKR WiFi 1010 whose processor speed is 48 MHz.
| Board | CPU speed |
|---|---|
| UNO Rev 3 | 16 MHz |
| Leonardo | 16 MHz |
| Nano 33 | 64 MHz |
| Nano | 16 MHz |
| Nano Every | 16 MHz |
| Mega 2560 | 16 MHz |
| UNO WiFi Rev 2 | 16 MHz |
| MKR WiFi 1010 | 48 MHz |
Speed is not important when first starting out with Arduino – this is what I’ve found after chatting to many beginners about what sort of project they’re first looking to build. There aren’t many projects where you’ll notice the difference between a 16Mhz and a 48Mhz processor. Audio processing projects are one of the few beginner projects where you might notice the speed.
Useful projects can still be built with the ‘slower’ processors, including sensors, wearables, robots, CNC controls, and 3D printer controls.
I wrote a guide comparing the speed of different Arduino models, check it out here: chipwired.com/arduino-speed-guide/
Memory
The beginner-friendly Arduino with the most memory is the Nano 33 with 256 kilobytes. By comparison, the MKR WiFi 1010 has 32 kilobytes of memory, and the UNO has 2 kilobytes.
| Board | Memory |
|---|---|
| UNO Rev 3 | 2 KB |
| Leonardo | 2 KB |
| Nano 33 | 256 KB |
| Nano | 2 KB |
| Nano Every | 2 KB |
| Mega 2560 | 2 KB |
| UNO WiFi Rev 2 | 2 KB |
| MKR WiFi 1010 | 48 KB |
For comparison, having 2 KB of memory allows the Arduino to store nearly 1000 measurements (each being 2 bytes).
The amount of memory an Arduino has isn’t the most important thing to consider when first starting out with Arduino. Similar to the speed of the processor, I’ve found many of the projects that beginners want to build can be accomplished with the 2-8 kilobytes of memory found on most Arduino. Typically this is sufficient memory for processing basic instructions to motors, remembering coordinates, collecting sensor data, and establishing connections/storage to report that data for later use.
Arduino boards also come with other types of memory, namely EEPROM and program memory (used for storing a sketch). I wrote a guide to all the memory types that an Arduino comes with, check that out here: chipwired.com/arduino-memory-amount-guide/
I see Arduino models having a small amount of memory to be a fun challenge that we can overcome. It gives you the opportunity to find ways to efficiently use memory in your code, and to learn about computer memory in general. I did a little experimenting to see how to crash an Arduino, and a few of these crashes happened because of the way I treated the memory. The whole guide on how to crash an Arduino is here: chipwired.com/arduino-crash-hang-guide/
What to avoid
For beginners getting started with Arduino, I typically recommend avoiding these:
- MKR Vidor
- Portenta H7
- Third party Arduino clones, such as the SparkFun RedBoard
The MKR Vidor is an advanced Arduino equipped with an FPGA chip. This can be programmed to behave as its own processor capable of performing calculations as quick as you define them to be. I love playing with FPGAs, but I would never recommend one to a beginner (unless they specifically wanted to learn about FPGAs).
The Portenta H7 is a similarly advanced Arduino that is equipped with a unique dual processor system. It’s designed to allow real-time apps to run on one core, while the other core handles slower communications (real time means where it’s critical that decisions are made within microseconds, think automotive or factory computers). This is a very powerful board to experiment and prototype with, and not one I would recommend for beginners.
Third party Arduino clones, such as the SparkFun RedBoard are great – thanks to Arduino’s open source hardware design, third parties can make their own Arduino compatible boards. These boards offer an alternative to Arduino, while being compatible with most things that Arduino has to offer. Third party boards are also often a dollar or two cheaper than the original Arduino they are based on. Unfortunately I’ve found them to be a mess of terms and jargon that can make it confusing for a beginner to sift through – because of this, I recommend beginners stick to the official Arduino boards (no harm in branching out as you learn more about embedded computer design and programming however)
Bottom Line
As a beginner, consider buying one of these Arduino models
- UNO Rev 3
- MKR Wifi 1010
- UNO WiFi Rev 2
- Nano 33
Expect to pay $20-$35 for the board itself, and an additional $10-$20 for the components needed to build a project. If you’re not sure what project you want to build, consider buying a starter kit.
For beginners, I recommend avoiding: MKR Vidor, Portenta H7, or any third-party Arduino. I’ve found these to complicate the terms, jargon, and processes to work with these boards to likely cause confusion for a beginner.
Chris has spent over a decade learning, playing, and working with various embedded electronics and electronic systems. His first foray into Arduino came when it was still a brand-new concept and he remembers how tough it was for beginners to get started. Hopefully this guide makes it less confusing for beginners starting out with Arduino.