Figuring out how to power an Arduino is an important part of any project: Is the Arduino going to be near a wall, does the power source need to be portable, are we going to run cables to power the Arduino? I’ve put together a list of power sources for Arduino that hopefully give you some options to overcome challenges such as these.
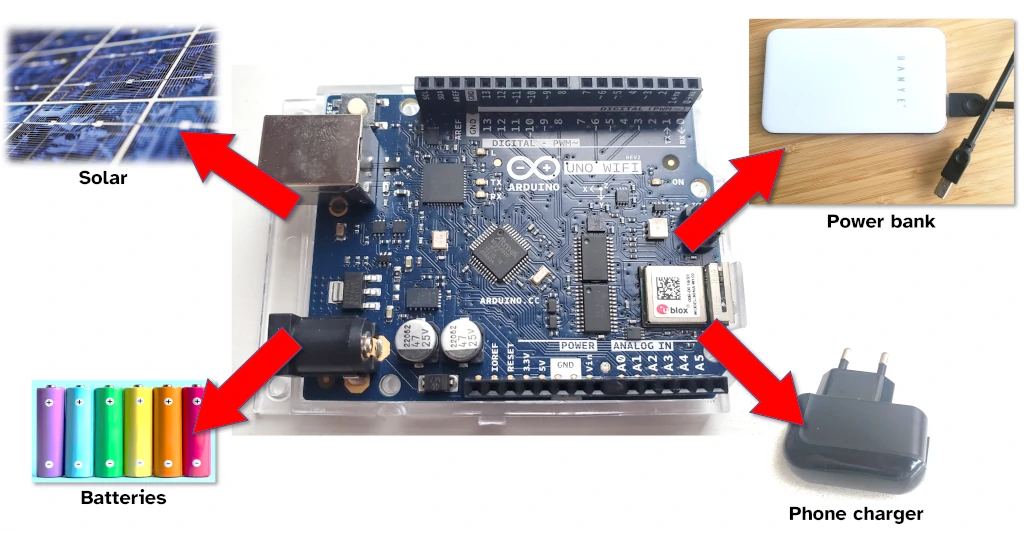
Arduino boards are typically powered by a USB connection, a DC wall adapter, or via the input pins on the header. Solar panels, batteries, and other power adapters can be connected to an Arduino using these methods to provide portable or uninterruptible power supply. Arduino shields are available to help the Arduino manage solar and battery power sources.
In this guide I’ve looked at a variety of ways to power an Arduino, and included typical costs and some pros and cons of each method for comparison. If you’re interested in how much power an Arduino uses, I wrote a full guide to that here: chipwired.com/arduino-power-use
1. Solar panel
A small solar panel can provide enough power for an Arduino to run. An Arduino running at 250mW can be powered by an 8cm by 14cm solar panel, if that panel has direct sunlight. A battery can be used in conjunction with the panel to ensure the Arduino has continuous supply. Solar panels for Arduino typically cost $5 to $10 without a battery, and an extra $10 for a battery.
Solar panels are unreliable. They only work when the sun shines on them. To overcome this unreliability, an Arduino project can:
- Use a battery back-up (where the battery is controlled by the Arduino)
- Use a solar panel that has a battery built in
- Use an Arduino solar module that provides a connection for a battery that drains when the solar is insufficient
If you’re interested in the Arduino solar module, I found this tutorial really interesting.
Comparing the price of these options:
| Solar Panel | Typical Cost |
|---|---|
| Solar panel (no battery) | $5 |
| Solar panel (and separate battery) | $14 to $20 |
| Solar module for Arduino | $15 |
| Solar panel battery pack | $20 to $50 |
Prices in this guide mostly come from my favourite stores. If you’re interested in how these compare in terms of price and shipping options, check out my guide to Arduino component shopping here: chipwired.com/arduino-component-shops
To use a solar panel with Arduino:
- Position the solar panel in direct sunlight
- Plug the solar panel into the Arduino
- Ensure the sunlight stays on the panel (or use an accompanying battery)
Most solar panels I’ve seen plug directly into the input power pins on the Arduino. Shield options are available if using a panel+battery combination designed specifically for Arduino. If using a battery pack solar panel, USB power options are also available.
Advantages of using solar panels with Arduino:
- Remotely power your Arduino without having to run a power cable
- Renewable power source
- Increases portability of your project
Disadvantages of using solar panels:
- Needs sun to shine on your Arduino
- Requires battery to ensure Arduino doesn’t turn off when sun stops shining
- May need to ensure low power consumption when writing your sketch
2. Power banks and rechargeable batteries
An Arduino can run from a rechargeable battery pack. Rechargeable battery packs include AA-sized lithium ion battery in their own holder, or portable mobile phone power banks. Power is provided as long as there is sufficient charge in the battery; an Arduino drawing 250mW of power can last a few hours on small batteries, or days on longer ones. Battery packs start at around $20 and can cost over $100 for larger ones.
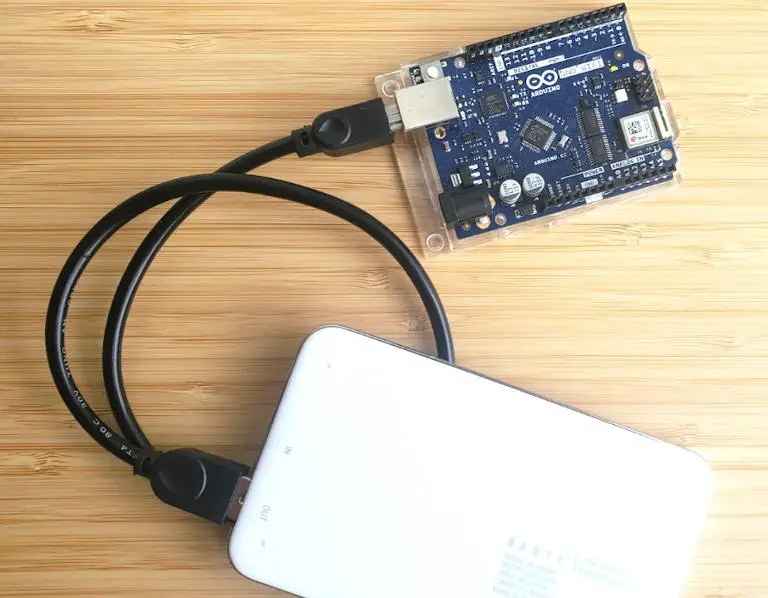
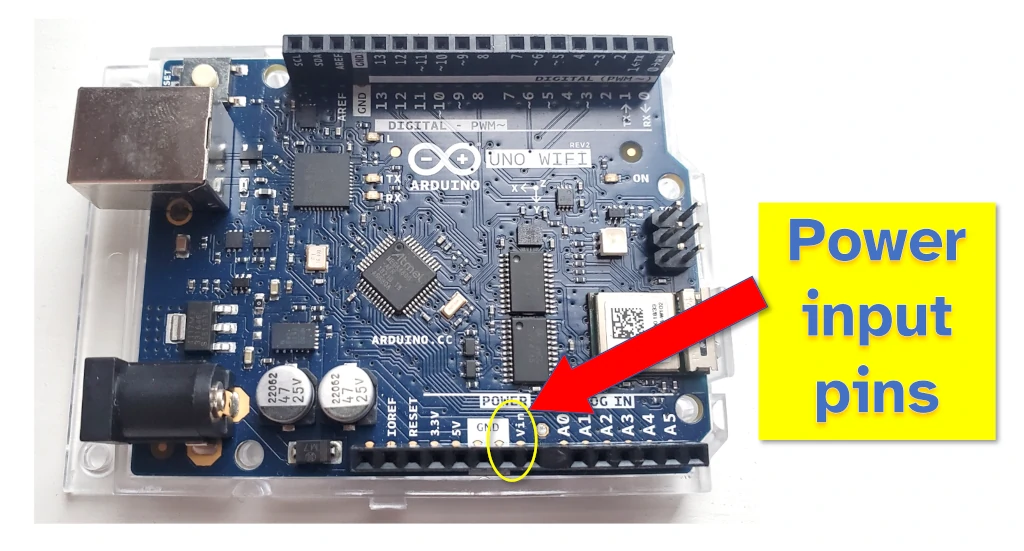
Battery packs typically provide power via the USB socket on the Arduino. I’ve never used extra circuitry or wiring with a battery pack because my projects have used this USB connection. It is possible to use rechargeable batteries that plug directly to the input power wiring on the Arduino.
If you need to save space or to integrate the battery with the Arduino (such as for a weather proofing case), rechargeable batteries can also be purchased in a block size (like a phone internal battery) or a AA or AAA standard size. These configurations typically connect to the 3.3V or 5V input pins.
Example costs of battery packs:
| Battery type | Typical cost |
|---|---|
| Small power bank (5000mAh) | $20 |
| Large power bank (20,000mAh) | $60 |
| AA batteries in holder (4 batteries) | $23 |
| Block battery (li-on) | $14 |
Advantages of using battery packs:
- Cheap
- Reliable (as long as there is power in them)
- Portable – they can move with your Arduino to places power cables cannot reach
Disadvantages of using battery packs:
- Need to be recharged
- Shouldn’t be exposed to sources of heat (e.g. the sun)
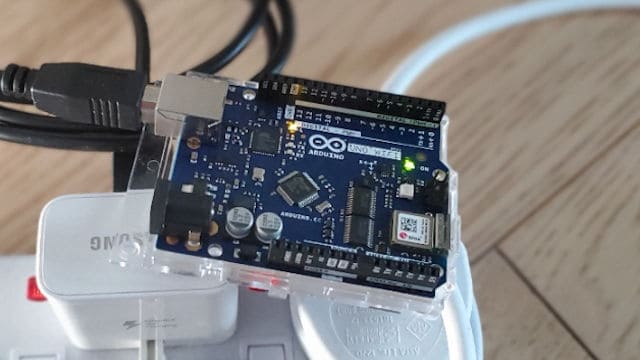
3. Cell phone charger
A mobile phone charger can be used to power an Arduino. Any phone charger that outputs to USB (preferably with a USB Type A connector) can be used to power an Arduino. This means all those leftover phone chargers you have lying around could be used in your next Arduino project!
Any charger designed to charge a phone via USB should be able to power an Arduino. This includes chargers provided with modern smart phones from the likes of Apple and Samsung. The phone charger outputs to the USB specification, and the Arduino USB port accepts power that meets the USB specification.
If you have to buy a new phone charger, the typical cost is $2 to $10. Every phone charger I have though came free when I bought a new phone. I bought the USB cable that connects the charger to my Arduino for about $3, and it shouldn’t cost any more than $10.
Using a phone charger to power an Arduino is a simple process:
- Plug in a USB cable that matches the USB type of your Arduino
- Plug the charger into the wall
- Turn the charger on
If you’re interested in more detail about the cables (and different USB types) used in powering an Arduino, I wrote a full guide to that here: chipwired.com/arduino-cables-and-wires
The phone charger should be able to output enough current to power most Arduino projects, including those that use motors.
Advantages of using phone chargers to power an Arduino:
- Very cheap and readily available
- Reliably supplies sufficient power for most Arduino projects
Disadvantages of using phone chargers:
- Power circuit cannot be modified (you shouldn’t open up the phone charger to tap additional power sources, such as for motors)
- Not portable, your Arduino is stuck within a 5m radius of a wall outlet
- May require a new USB cable (I had to buy a Type B cable because I didn’t have any already)
4. DC Adapter
A DC adapter (or DC power jack) can be connected to a household wall socket and then be used to power an Arduino. The DC power adapter plugs into the wall and connects to the round power socket on the Arduino.
While there is no official DC adapter for Arduino, any commercial one can be used that meets the following requirements:
- An output of between 7V and 12V DC (it cannot be AC)
- Rated for output of at least 250mA (ideally more than 500mA)
- Has a 2.1mm power plug for the Arduino
- The plug must be “centre positive” (i.e. the middle pin of the plug is the positive connection)
The requirements are available on the Arduino website here.
Typical costs of DC adapters:
| DC Adapter Configuration | Cost |
|---|---|
| Single plug | $8 to $9 |
| Interchangeable plug (with different sized plugs) | $23 |
A DC adapter can only be used on some Arduino, such as:
- UNO Rev 3
- UNO WiFi Rev 2
- Leonardo
- Mega 2560
Arduino MKR models do not typically work with DC adapters.
If you’re interested in what to buy when first starting out with Arduino, check out my guide here: chipwired.com/new-arduino-buyers-guide
Advantages of using DC adapters for powering an Arduino:
- Cheap
- Standard way of powering electronics
- Reliable
Disadvantages of DC adapters:
- Only capable of being used on some Arduino models
- Cannot typically be shared with other devices
- Not portable, your Arduino is tied to a 2m radius from the wall
5. Disposable batteries
Disposable batteries can be used to power an Arduino. These include standard AA or AAA batteries, as well as 9V disposable batteries. The batteries are typically placed into a holder and then wired to the Arduino directly or via a USB converter.
Costs of batteries are a few dollars each. Usually a case is required to hold the batteries together in a configuration that provides sufficient voltage for an Arduino, these typically cost $2 to $7.
Typical costs of powering an Arduino with batteries:
| Battery Type | Cost |
|---|---|
| 2x AA batteries with case | $6-$8 |
| 2x AAA batteries with case | $6-$8 |
| 9V battery (with top connector) | $9-$10 |
| 2x AA batteries with USB case | $10-$12 |
I always found the USB case interesting – a device that “converted” regular batteries to USB power. In reality, I imagine there’s not much more to these cases than a battery holder and a voltage divider circuit.
Advantages of disposable batteries for powering Arduino:
- Cheap
- Portable
- Lower risk than rechargeable
Disadvantages of disposable batteries:
- Wasteful
- Need to be replaced
- Can be more expensive if you have to replace them frequently
6. Uninterruptible power supply
An Uninterruptible Power Supply (UPS) is a device that promises no interruptions to the power delivered to a connected device, even if there are problems with the source power supply. This means that if the source supply disconnects and reconnects (even a few hours later), the UPS will hold the power steady for your connected devices.
A UPS can also help protect your Arduino from some over-current and over-voltage faults. While the Arduino’s internal circuitry offers some protection for the CPU from small variations in the current and voltage, a UPS provides an extra layer of protection, particularly if you have an unreliable source power supply.
When I was young we used to have brown-outs. These would disrupt electronics around the house, such as causing my computer to reboot. A UPS would have protected me against this and allowed my computer to run without rebooting.
A UPS suitable for use with an Arduino can cost anywhere between $30 and about $200 depending on how long the supply is needed for in the event of complete power outage. It is possible to spend thousands on a UPS, though these are typically overkill for an Arduino project.
Example UPS costs:
| Model | Cost | Backup Time |
|---|---|---|
| Xdorra Mini UPS | $40 | 6-8 hours |
| Shanqiu | $35 | 10 hours |
| APC Sine Wave UPS | $143 | 15 hours |
Advantages of using a UPS to power an Arduino:
- Reliable, more reliable than batteries
- Lasts a long time
Disadvantages of using a UPS:
- Expensive
- Still needs an input power source (e.g. connect to a wall, or plug in a solar panel)
7. Hand cranked generator
Hand cranked power generators with an internal battery can be used to power an Arduino. A hand cranked power generator provides you a lever to move that generates electricity for connected devices. To work with Arduino the generator must have a battery included as the power of your arm alone isn’t strong or consistent enough to fully power an Arduino.
To use a hand cranked generator with an Arduino:
- Crank the handle to add power to the generator unit’s battery
- Connect your Arduino to the provided USB
- Crank the handle occasionally to add power
Any hand cranked generator that includes a battery should be suitable for Arduino, particularly if it provides a USB outlet (alternatively a DC adapter can be used). These typically cost $26 to $60.
| Model | Cost |
|---|---|
| Marbero 22500mAh Portable | $60 |
| FosPower 2000mAh | $29 |
| Generic 2000mAh | $26 |
These are typically used for camping, though they can be used to power an Arduino as well.
Advantages of hand cranked generators for powering Arduino:
- Portable
- More reliable to recharge
Disadvantages of hand cranked generators:
- You have to manually crank it (this can get tiring!)
- You have to manually crank it often (each crank doesn’t power the Arduino for very long)
- Expensive initially
8. From a television
A USB port on a television can be used to power an Arduino. Similar to the phone charger, a television can output standard USB power via its USB port – this can be used to power an Arduino.
I’ve used this in a hotel. When I was staying in a hotel room I needed to power my Arduino (for a Chip Wired project I suddenly had inspiration for). I figured since the TV met the USB standard, it must be able to power an Arduino, and it worked! Of course, I could’ve used my phone charger or my computer, but I enjoyed the experiment.
The only additional cost here (apart from needing a TV) is for the cable. My USB Type A (TV side) and USB Type B (Arduino side) cost a few dollars from a local market. I didn’t even need to pay for the electricity! (since it was a hotel…)
The best time to use this way of powering an Arduino would be if your project already outputs to the television. Arduino can work with HDMI, so it is possible to build projects that output to a television. I’ve personally never tried this though – please let me know if you get it working.
Advantages of powering an Arduino from a television:
- Easily available
- Reliable
- Useful for projects where the Arduino connects to the TV anyway
Disadvantages of using a television:
- Not portable – the Arduino must be within 2-5m of the television
- Alternative sources are usually more readily available
9. From a computer
This is the standard way of powering an Arduino. To plug it in to the computer using a USB cable. I included this one for completeness, most Arduino users should be familiar with this method.
When an Arduino is being programmed, it draws its power from the USB port on the computer.
Typical costs are $2-$5 to cover the cost of the USB cable. For more detail on which type of USB cable to use, check out the guide I wrote here: chipwired.com/arduino-cables-and-wires
Advantages of using a computer:
- Reliable
- Cheap
Disadvantages:
- Not portable
Chris is fascinated by exploiting ways to power devices, he constantly tries to think of new ways to reliably get power for his electronics projects