While putting together a guide on how to connect Raspberry Pi to the cloud, I realised that it wasn’t a straightforward guide for helping anyone send data from a Raspberry Pi to a REST API (as is typically used by cloud service providers). I put this guide together to help anyone get the basics of how to send JSON data from their Raspberry Pi to the cloud.
There are 4 steps to get a Raspberry Pi to send JSON data to the cloud:
- Import the JSON library
- Gather some JSON data
- Find out the details of the API
- Send data to the API
I’ve used Python in this guide and the Thonny Python IDE as it’s the most common setup I’ve found on Raspberry Pi.
Step 1: Import the JSON library
Data sent to a REST API is typically in a JSON format. JSON is an easy format to write out by hand, but Python has a convenient built-in library to make sure we’re working with JSON in a correct format.
Python’s built-in JSON library allows you to work with JSON without having to know all the syntax and character requirements of putting together your own JavaScript Object Notation(JSON) string.
Use the following code to import the JSON:
import jsonThe JSON library will make it easy for us to turn Python’s native dictionary format into JSON so that we can send it to our cloud storage server using a REST API.
Step 2: Gather data
We need some data to send over the REST API. I’m going to use the example of a series of temperature and humidity measurements taken over time.
Our approach to generating some JSON data will be to:
- Setup a dictionary object to hold our reading
- Create a loop where we generate new readings of temperature and humidity
- Convert the dictionary to JSON
Initially I bundled all the data into an array (see below), though the it turned out the API I was using didn’t accept that.

I’ve used a for loop for this example because we only want the script to run a few times to generate some data. If you were applying this in a real project, this is probably where you’d want to use an infinite while loop.
This code can easily be modified to collect real data from a connected sensor (I wrote a guide for connecting a sensor, check it out here: chipwired.com/connect-sensors-raspberry-pi). I have a Sense HAT connected to my Raspberry Pi and modified the code to include actual readings from the Sense HAT:
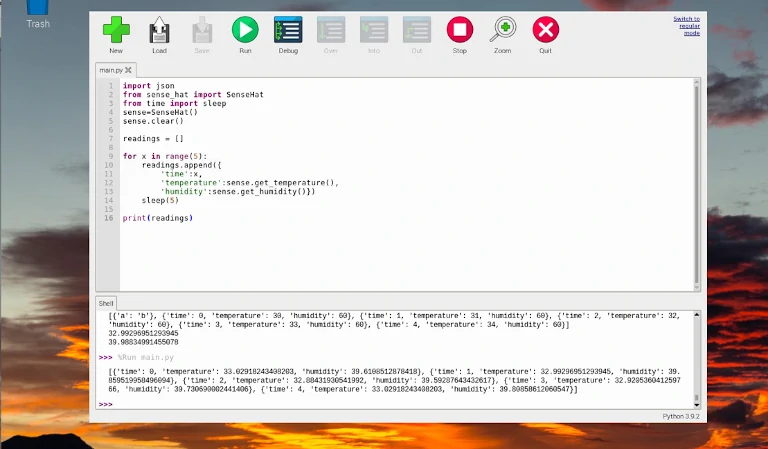
I added a sleep of 5 seconds between readings so that we’re getting useful data from the Sense HAT.
Converting this data to JSON is the final task we need to do in this step. A Python dictionary is easily converted to JSON using the json library we imported earlier and the following command:
data = json.dumps(readings)If you print this JSON data it doesn’t look much different. This is because the way Python arrays and dictionaries are printed happens to match the way JSON is printed. Under the hood, Python is managing our data as JSON though, which will make it easier to upload to our cloud storage provider in the next step.
Step 3: Find the API details
Each API has slightly different ways of communicating with it, but in general you need the following pieces of information:
- A URL for sending data to;
- A URL for reading data from;
- An API key, usually unique to you.
These details are typically found in your API provider’s documentation. Some make it really easy (like the free Pantry Cloud I use below) and some make it really hard (looking at you ‘large tech company’).
For this example I’m using Pantry Cloud. It is a JSON data storage cloud service that is really easy to setup (no password required!) and has a generous free tier.
Pantry cloud requires you to have a ‘basket’ to put your data into. You can name the basket when you get your API key from their website.
| URL for sending data to | PUT request: https://getpantry.cloud/apiv1/pantry/YOUR_PANTRY_ID/basket/YOUR_BASKET_NAME |
| URL for reading data from | GET request: https://getpantry.cloud/apiv1/pantry/YOUR_PANTRY_ID/basket/YOUR_BASKET_NAME |
| API Key | YOUR_PANTRY_ID |
The different request types (PUT and GET) are part of the HTTP protocol. These tell the cloud API what sort of request you’re doing – PUT means you want to put data on the server, while GET means you want to get data from the server. See below for an example of how we do this in Python on Raspberry Pi.
Interested in more cloud services a Raspberry Pi can connect to? I wrote a whole guide on over 8 cloud services that a Raspberry Pi can use, check it out here: chipwired.com/cloud-connections-raspberry-pi
Step 4: Send data to the API
The next step is to setup our Python script to connect to the API. We’ll do this by:
- Importing the requests module
- Giving the requests module our API information
- Completing a ‘request’ with our API (to store or read data)
The code to achieve this is basically:
import requests
url = "https://..."
our_headers = {...}
our_payload = our_data
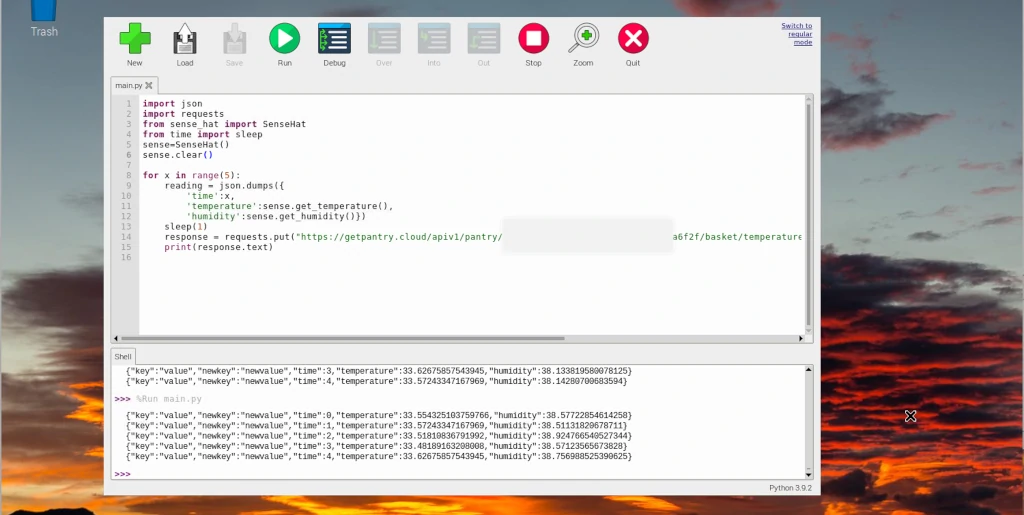
response = requests.put(url, headers=our_headers, data=our_payload)The above code is for a PUT request where we’re sending data to the API. Simply change the function to requests.get if you need to retrieve data instead. Retrieved data is stored in response (try response.json() to access it)
The API documentation should give you details of any headers you have to set, and whether you have to take any other steps such as authentication. I found this guide really helpful for figuring out how to use a REST API if you have to worry about sessions and authentication.
I modified the code above for an example of how we can send data to the Pantry Cloud REST API, see the picture below.
Next Steps
Once the Pi is capable of sending data to the cloud using a REST API, you probably want to be able to do something with your new power:
- For more details about how to collect data with a Raspberry Pi, check out my guide here: chipwired.com/collect-data-with-raspberry-pi
- To have the data collection script run on startup try this guide (I use the crontab method)
- Excel files and databases can be used by a Raspberry Pi as an alternative to sending data directly to the cloud. I wrote a whole guide on the various ways a Raspberry Pi can store data here: chipwired.com/raspberry-pi-store-data