Storing data is the next step after collecting it. This guide will take you through how a Raspberry Pi can store data it has collected; data that is to be used for later analysis. Storage is an important part of the data analysis process (collection, storage, analysis, action), and this is part of the series of guides I’m writing on that process.
A Raspberry Pi can store data in an Excel file, a CSV file, in a database, and over the internet using its WiFi or Ethernet connections. The best way to store small amounts of data, such as that collected by a sensor connected to the Raspberry Pi, is by using a CSV file, an SQLite database, or TinyDB. These data storage techniques are compatible with the packages of Python that are available for Raspberry Pi.
I’ve found the best ways to get data out of the Raspberry Pi are by:
- Uploading that data to the internet, such as by using cloud storage or an HTTP API
- Saving to a USB flash drive and then copying to another computer
- Using Network Attached Storage that the Raspberry Pi can access via Ethernet or WiFi
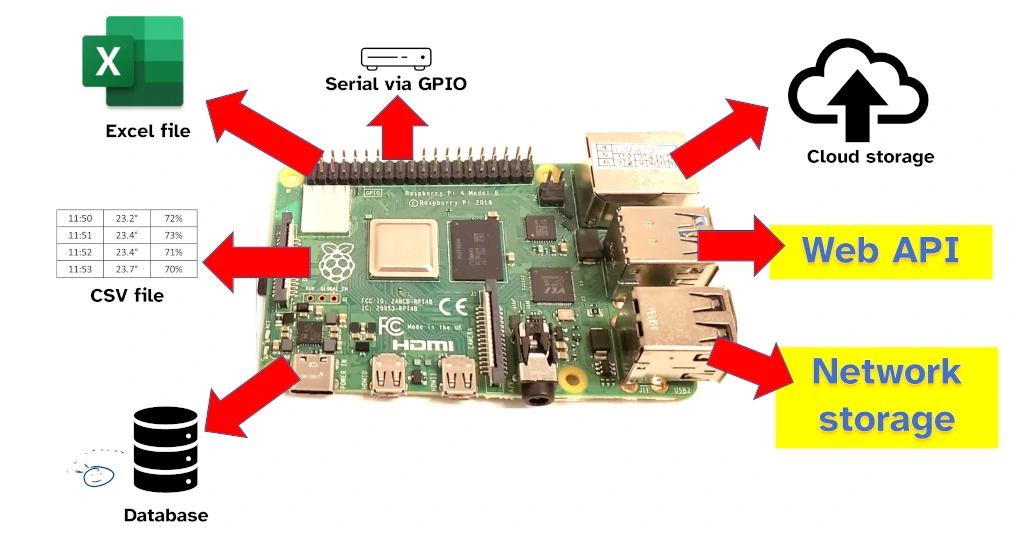
I’ve also found it’s possible to save small amounts of data using the serial connection available via the Raspberry Pi’s GPIO, though this is typically only suitable for small amounts of data.
In this guide I’ve looked at:
- Different file formats available for Raspberry Pi (e.g. Excel files, and CSV files)
- Databases that a Raspberry Pi can use (e.g. SQLite, and TinyDB)
- How to store Raspberry Pi data away from the device itself (cloud storage, HTTP API, USB flash drive etc.)
1. Excel file
A Raspberry Pi can store data in an Excel file using LibreOffice Calc or by coding an app in Python. Data can be stored in the .xlsx format, which can then be opened by Excel. Some advanced features of Excel files, such as custom formatting and complicated formulas, may not work when saved using a Raspberry Pi.
Having the Raspberry Pi store data in an Excel format can be great for:
- Storing data that’s going to be analysed by Microsoft tools later (e.g. PowerBI, Excel)
- Preparing graphs, charts, or pivot tables based on data captured by a Raspberry Pi
- Formatting data for display
I’ve found Excel to be a useful format for storing data that will be later analysed using Microsoft tools, particularly Excel and PowerBI. This data can be captured from sensors using a Raspberry Pi, stored in an Excel file, and then analysed by these tools on a larger / more powerful computer. If you’re interested in how the Raspberry Pi can collect data, I wrote a separate guide to that here: chipwired.com/collect-data-with-raspberry-pi/
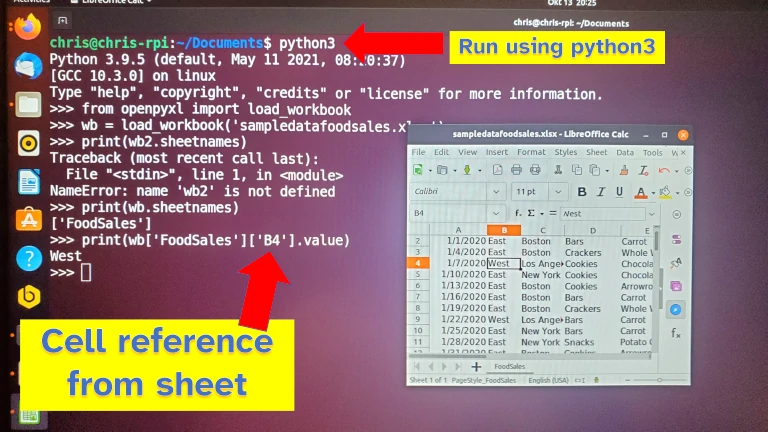
To have the Raspberry Pi store data in an Excel file:
- Use Python pip to install the openpyxl module
- Write an app to collect data
- Use openpyxl to write your data to the workbook
- Save the file as .xlsx
I wrote a whole guide on the different ways a Raspberry Pi can use .xlsx files (including Python and openpyxl), check it out here for more detail: chipwired.com/r-pi-open-excel-files/
Some disadvantages of using Excel files for storage are:
- Microsoft Office doesn’t run natively on Raspberry Pi. This means the full range of Microsoft Excel features will never be available on a Raspberry Pi making it harder to format data and analyse using pivot tables and charts
- It’s harder to read and write Excel files in other programming languages – if you want to share this data with an app written in a different language (such as OCaml), you might be better off storing in a different language
- Excel files created by a Raspberry Pi may not work well with other apps, even those that are designed to read Excel files
2. Cloud storage
Data collected by a Raspberry Pi, including data from sensors, can be stored in the cloud. The Raspberry Pi can access popular cloud storage services such as Amazon AWS and Microsoft Azure, and it can also communicate with bespoke cloud services such as JSON Bin. Sensor data can be stored in the cloud by having the Raspberry Pi use the relevant cloud storage API.
Some benefits of using cloud storage with a Raspberry Pi include:
- Data is accessible from anywhere with an internet collection, it’s not limited only to the Raspberry Pi used to collect the data
- Analysing the data can accomplished using a more powerful processor, either using cloud services or by downloading the data to a more powerful computer
- Data is backed up automatically
I feel that this is the future: Small low-powered computers which interact with people and the world yet do all their processing and data storage on the cloud. We can create a network of IoT sensors using Raspberry Pi, or replace our desktops with Raspberry Pi, and in both cases utilise the cloud to accomplish the tasks we want to do. Utilising cloud storage and services is a perfect match with Raspberry Pi.
To use cloud storage with Raspberry Pi:
- Sign up for an account with a cloud storage provider
- Setup the Raspberry Pi to communicate with the cloud using their preferred method (this is usually via an HTTP API)
- Collect data on the Raspberry Pi
- Connect to the cloud and upload the data
Free cloud storage providers I like to use include Pantry Cloud and JSON Bin. I also like Linode as a cloud storage provider, though they do not have a free option available (it only starts at $5/month though!). The big names in cloud storage are Azure by Microsoft, Amazon AWS, and Google Cloud.
I wrote a whole guide on how to send data from a Raspberry Pi to Pantry Cloud for free. If you’re interested, check it out here: chipwired.com/raspberry-pi-send-json-data-to-rest-api
Drawbacks of using cloud storage on Raspberry Pi include:
- An internet connection is needed. This increases the amount of power the Raspberry Pi uses and may also limit the range on location the Raspberry Pi needs to be located in (it can’t be too far from a WiFi access point)
- An account with a cloud storage provider is required. This can increase the price of a project as free options are usually limited to trials or small amounts of data.
- Cloud storage providers can have complicated APIs or steps required to connect to their cloud; it’s not as simple as storing to a file located on a Raspberry Pi.
3. CSV file
CSV (Comma Separated Values) files are one of the easiest ways to store data collected by a Raspberry Pi. A Raspberry Pi can store data in a CSV file using Python or any programming language that can run on a Raspberry Pi. CSV is an open format for file storage that is available on Raspberry Pi.
Use CSV with a Raspberry Pi when:
- Saving simple data that will be analysed by other apps or programming languages
- You need to save bandwidth or storage space (CSV is a very compact and efficient file format)
- Need to quickly read the data yourself, including if you need to modify small amounts of data manually
CSV files can easily be read and opened using text processing apps, as well as spreadsheet tools. Many of the tools I mention in my guide to Excel files also work well with CSV files (check out that guide here: chipwired.com/r-pi-open-excel-files/).
I’ve found that CSV is a great format to use for saving small amounts of data from a Raspberry Pi, data that will be analysed later. I’ve used CSV to record temperature readings over time, counts of a motion sensor being activated, and samples of a voltage level reading.
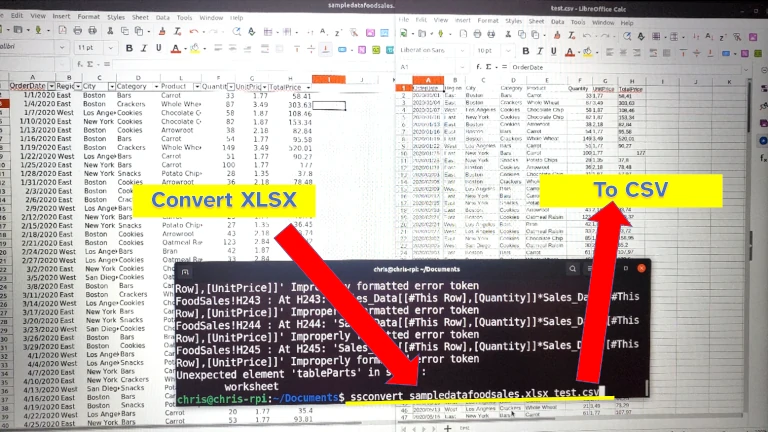
To use CSV on a Raspberry Pi:
- Add the CSV library or module to whichever programming language you’re using (in Python it’s called
csv) - Open a CSV file
- Append a sensor reading or other data to the file
- Close and save the file
The CSV file can then be opened by an app for use and analysis, either on the Raspberry Pi or on another computer. CSV files can also be uploaded to the cloud for analysis.
Some downsides to CSV files include:
- Inability to save any analysis in the file. CSV is a format for saving data only, any analysis, graphs, pivot tables, or other information must be stored in a different file
- No way to format, summarise, or annotate the data
- Some apps may disagree on the character used to separate rows and columns in data – this means having to understand separators which I find annoying given the objective of simplicity that CSV is chasing
4. SQL database
A Raspberry Pi can communicate with an SQL database to store data. This includes creating new tables, storing data in the tables, and even querying that data to perform analysis. A Raspberry Pi can host an SQL databases on itself, or it can connect to one remotely.
Storing data in an SQL database is the typical treatment of any data collected, including that collected by a Raspberry Pi. Working with SQL databases is one of the first things I learnt when learning about data analysis.
SQL databases are great for:
- Reliable recording and long-term storage of data (the database will often ensure each record is error free, and that the storage does not contain errors)
- Storing data that matches a “table” structure, including data “transactions” (such as frequent temperature readings)
- Straightforward way to ‘append’ data to a data set (in SQL, it is a single statement to add a data reading; in other methods such as CSV, it can involve reading the entire data set before appending a single data reading)
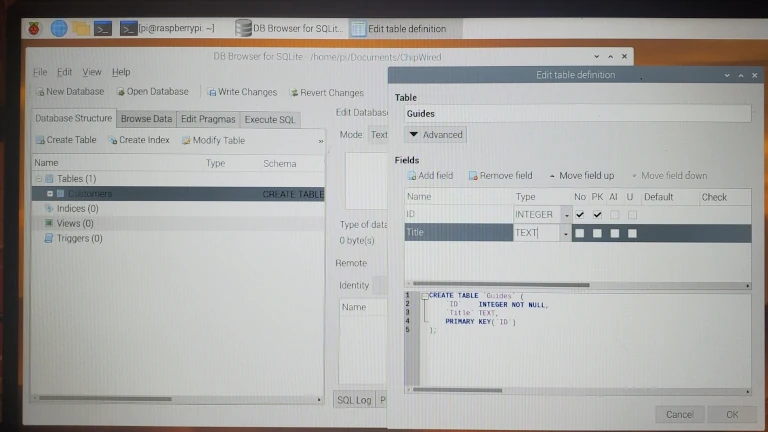
To use an SQL database on a Raspberry Pi:
- Setup an SQL database with a table ready to save the data your Raspberry Pi sends
- Connect your app to the SQL database (if you wrote the app yourself, you’ll likely need to use the appropriate library, module, or driver for the database that you want to connect to – e.g.
sqlite3in Python for connecting to an SQLite database) - Save data to the database using the functions in the library, module, or driver
A Raspberry Pi can host a database itself, or connect to another one. If you’re interested in running a database on your Raspberry Pi (it’s not has hard as it seems), check out my guide to SQL databases on Raspberry Pi here: chipwired.com/sql-databases-for-raspberry-pi/
A few downsides to using an SQL database with your Raspberry Pi:
- A basic understanding of the SQL language will likely be required to store and later extract data from the database
- It can feel complicated to connect to an SQL database from an app (it’s not as hard as it seems)
- It can also feel like it’s harder to visualise data in an SQL database (this becomes easier as you learn more about databases)
- A connection to a database is required. If this is hosted remotely, it will mean using the Ethernet or WiFi on the Raspberry Pi potentially costing more power to use.
5. NoSQL database
Databases that do not use SQL will also work on a Raspberry Pi. A Raspberry Pi can connect to NoSQL databases, or it can host them itself. NoSQL databases such as MongoDB or TinyDB can run on a Raspberry Pi itself. A Raspberry Pi can also connect to other NoSQL databases such as Azure Cosmos DB or Cassandra.
I found an overwhelming number of NoSQL databases that Raspberry Pi can connect to. It’s been a bit harder to setup a NoSQL database on a Raspberry Pi, which is why I didn’t include many examples above. “NoSQL” is a bit of a catch-all term for databases that don’t follow the relational-SQL model, so the type and nature of each databases is quite varied.
NoSQL databases on Raspberry Pi are good for:
- Simple data storage, often the interface to store data is simpler than even an SQL database
- If you don’t know what the overall model is going to be yet. It is generally easy to change the structure of a NoSQL database as your project evolves; this is harder to do with an SQL database
- If the data analysis will be done on another computer. It might not be as easy to analyse data stored in a NoSQL database running on a Raspberry Pi, it might be better to analyse this data on another computer
To use a NoSQL database on Raspberry Pi:
- Setup the NoSQL database on the Raspberry Pi (or identify which one you want to connect to)
- Install the library or module for connecting to that database
- Write an app that collects data, connects to the database, and stores that data in the database
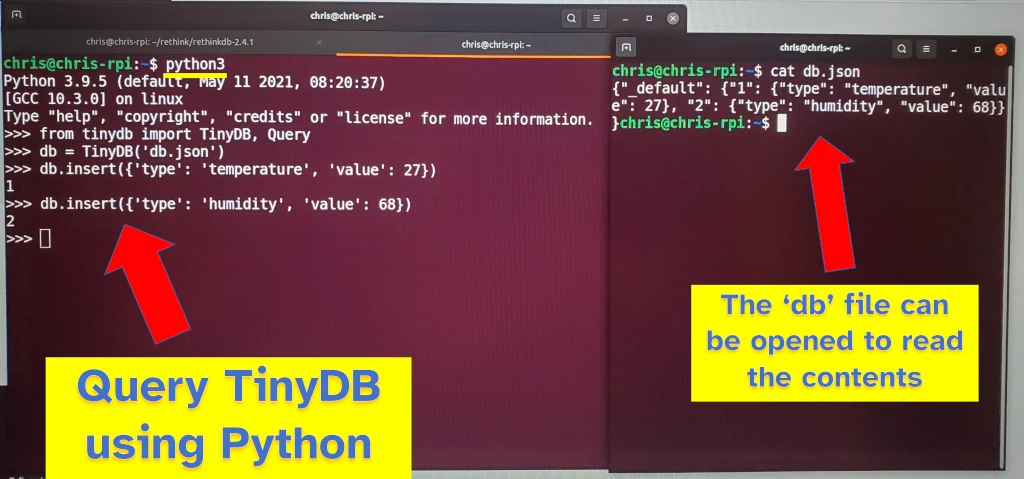
The easiest NoSQL database I found to work with on Raspberry Pi is TinyDB. I included it in my guide to Raspberry Pi databases, which can be found here (more detailed instructions included): chipwired.com/databases-for-raspberry-pi/
Some downsides to using a NoSQL database include:
- Analysis of the data can be a little harder if you have significant amounts of data; it may need to be transformed or read into another system before being analysed
- Display and formatting of data may be similarly harder
- A connection to a database is required – if the database is hosted remotely, this means the Raspberry Pi will have to consume additional power to maintain a WiFi or Ethernet connection to store data in the database.
6. USB flash drive
A Raspberry Pi can use its USB ports to store data on a USB flash drive. Raspberry Pi supports a wide variety of flash drive hardware and file systems used to format flash drives. If using a USB flash drive to store data for a Raspberry Pi project, it is recommended to use a blank one specifically for this purpose (i.e. avoid sharing flash drives between Raspberry Pi projects and other uses).
Storing data on a flash drive is good when you need a Raspberry Pi to:
- Capture a lot of data, too much to send over the internet connection available
- Store data when a reliable internet connection is not available
- Use less power by turning off the WiFi and Ethernet functions
I found USB flash drives to be a good way to get files of stored data out of a Raspberry Pi, particularly when there’s no internet connection available. The files discussed earlier (Excel, CSV, and even SQLite databases) can be saved to a USB stick and easily transferred to another computer.
To have a Raspberry Pi save data to a USB flash drive:
- Connect the flash drive and format the flash drive to use a file format well supported on the Raspberry Pi (e.g. FAT32 or exFAT). Note, formatting will delete data already on the flash drive. A guide to formatting can be found here.
- Locate where the flash drive is mounted (from Terminal try this guide; from Python try this guide)
- Use an app (such as one you wrote) to collect data and save it to the flash drive
A USB flash drive may not be a good solution if:
- Python or Terminal work isn’t your strength. I found it really hard to figure out how to automatically get the Raspberry Pi to recognise the USB flash drive and then save data to it (I had to manually check things each time I plugged in the flash drive)
- You need to keep the size of the Raspberry installation small (i.e. you can’t have a flash drive sticking out one end)
- Retrieving the USB flash drive will be difficult, for example if the Raspberry Pi project is installed in a remote location, or somewhere that’s out of reach for a person to get to
7. Web API
A Raspberry Pi can use web APIs as a way to store data. For web APIs hosted on other servers, the Raspberry Pi can upload its data by using that APIs endpoints. The Raspberry Pi can also establish itself as a web API server and receive data from other devices to store in a database. Web APIs are one of the methods used to access cloud storage.
When to use a web API with Raspberry Pi:
- If you’re setting up the Raspberry Pi as a server and it will receive data from other devices using a web API
- If an internet service you want to use to store data offers a web API (e.g. a Tesla API)
- The web API you’re using offers data analysis capability
I’ve found web APIs are a common way to access cloud storage (see above for details on how to use cloud storage), however there are some web APIs that I wouldn’t call cloud storage. These can be specific to a particular use of Raspberry Pi, such as connecting to a Tesla.
To connect to a web API using a Raspberry Pi:
- Identify the API and read its instructions on how to connect
- Import the appropriate module to connect to the API according to the instructions (typically for Python this is
requestsmodule) - Follow the module’s instructions to connect to the API and exchange data
A Raspberry Pi can also be setup to serve a web API. This can be done using a framework such as Flask.
Disadvantages of using a web API with Raspberry Pi are similar to other internet-based storage methods:
- Need to consume power using the WiFi or Ethernet connections
- Can be difficult to setup (depending on your Python coding skills)
- Display and formatting of data may rely on using another tool
8. Serial and GPIO
Data can be sent to a storage device connected to the serial communication pins of the Raspberry Pi’s GPIO. Once another device, such as flash storage, is connected to the GPIO, an app running on the Raspberry Pi can send data to it. The Raspberry Pi supports SPI and I2C serial connections over the GPIO.
Using the GPIO to store data is useful when you need to:
- Store data that will be used by another microelectronics device
- Store small amounts of data that will be saved even when the Raspberry Pi loses power
- Use less power
In my opinion, using the serial interface to store data is best when you want to conserve power. It will use less power than establishing a WiFi or Ethernet connection every time you want to save some data, and it should also give a power saving compared to writing to a USB flash drive.
I typically see flash storage range from 1mb to 128mb (yes megabytes). The price range for this can be between $1 and $30 depending on how you connect it to the GPIO (if you can solder to a breakout board it’s cheaper than using a breadboard).
To use the Raspberry Pi GPIO to store data:
- Buy flash storage that supports a serial (SPI or I2C) interface
- Plug the flash storage into a breadboard, or solder it onto a breakout board that can be plugged into a Raspberry Pi
- Import the appropriate library or module (I found this tutorial helpful) to your app
- Use your app to communicate with the storage
Some disadvantages of using the GPIO to store data:
- It’s complicated to setup. An advanced understanding of Python or C/C++ is needed to communicate with storage attached to the GPIO; some understanding of electronics (e.g. how to connect the flash memory to the GPIO) is also needed.
- Small storage available. If you need more than say 128mb of storage, it’s likely more cost-effective to explore an alternative solution.
- It may increase the size of your Raspberry Pi (as another circuit has to be built around the storage chip)
9. Network attached storage
A Raspberry Pi can use a NAS (network attached storage) to store data, or it can act as a NAS and have other computers use it for storage. Connecting to a NAS involves mounting it as part of the Raspberry Pi file system and then reading and writing data to files stored on the NAS. Setting up the Raspberry Pi as a NAS involves installing a SAMBA server and sharing storage connected to the Raspberry Pi.
I’ve found this more useful when you want to setup the Raspberry Pi as a NAS to store data from other computers on a network. The other methods discussed in this guide are more useful if you want to collect data from a Raspberry Pi and store it somewhere else.
To connect the Raspberry Pi to a NAS:
- Ensure the appropriate communication protocol for your NAS is installed on your Raspberry Pi (this is typically smb)
- Mount the NAS in your Raspberry Pi’s file system
- Use files on the NAS as you would any file locally
A full guide can be found here.
To setup the Raspberry Pi as a NAS, check out this guide here.
Disadvantages for using a NAS with Raspberry Pi are:
- A network connection (Ethernet or WiFi) is needed, this can use extra power
- The network connection needs to be reliable, data may be corrupted if the connection is disturbed while accessing files
- Storing the data may involve an extra step (e.g. writing to an Excel file, and saving that Excel file on the NAS)
Chris is building a complete guide on how to analyse data with the Raspberry Pi. Data collection, data storage, and data analysis are the key pillars of this guide.