It can be difficult to identify exactly which type of Arduino you’re using, particularly if you’ve just purchased it or if you’re using a clone Arduino (“Arduino compatible” devices). I put together this list of steps to help anyone figure out which Arduino model they have.
This guide looks at some of the differences between Arduino models, including the microcontroller type, presence of WiFi, number of I/O pins, and the typical size of the board. Other ways to differentiate Arduino include plugging it into a computer and using the IDE to read from it, and identifying information printed on the PCB. This guide will also help figure out which version of Arduino you’re using (for models which have different versions)
1. Use the microcontroller label to identify the board
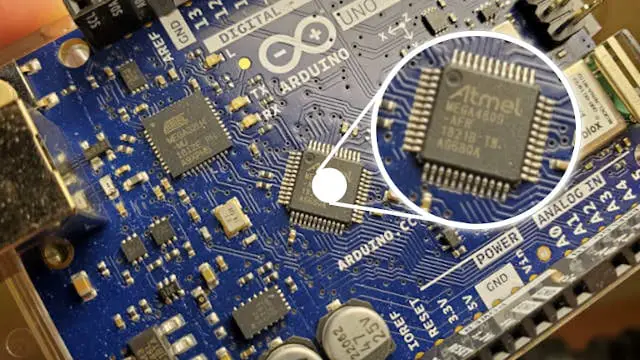
At the heart of every Arduino is the microcontroller responsible for processing the code/sketches that are programmed into it. Each model of Arduino uses a different microcontroller.
The model of microcontroller, printed on the top, can be used to identify the Arduino (or Arduino compatible) board.
A list of the Arduino microcontroller labels is in the table below:
| Arduino Board | Microcontroller Label |
|---|---|
| UNO Rev 3 | ATMEGA328P |
| Mega 2560 | ATMEGA2560 |
| Nano | ATMEGA328 |
| Due | AT91SAM3X8E |
| Leonardo | ATMEGA32U4 |
| Micro | ATMEGA32u4 |
| UNO WiFi Rev 2 | ATMEGA4809 |
| Yun Rev 2 | ATMEGA32U4 |
| MKR 1000 | ATSAMW25 |
| MKR WiFi 1010 | ATSAMD21 |
| MKR Vidor 4000 | Intel Cyclone 10 |
The first two letters may appear as the “Atmel” logo instead. That would mean an “ATMEGA4809” may be labelled as “Atmel MEGA4809”, as in the picture above.
Take care that some Arduino boards also have another microcontroller that is used as a programmer for the main one (there is one of these in the picture above).
If you’re interested in how these boards compare, I recently wrote a whole guide comparing many of these boards for beginners (hint, avoid the Vidor if you’re just getting started). Check the guide out here: chipwired.com/best-arduino-for-beginners/
2. Use the Arduino IDE to identify the board name
The Arduino IDE can read a lot of information from a connected Arduino.
To find out the board name from the Arduino IDE:
- Connect the Arduino to the computer
- Open the Arduino IDE
- Click Tools > Get Board Info
The BN field will display the model name.
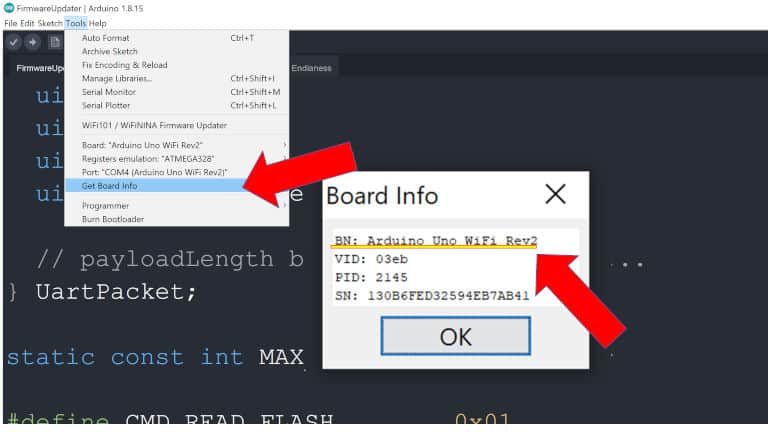
If an error comes up about needing to write a program first, upload a simple blink program to the Arduino (this gives the IDE a chance to communicate with the device to figure out its type). I wrote a guide to uploading a program (sketch) here: chipwired.com/uploading-code-arduino/
Other errors are usually related to drivers. Run through the driver installation wizard that came with the IDE (if using Windows) and hopefully that fixes it up. I’m still working on a step-by-step guide on how to do this.
3. Most Arduino have their board type printed on them
Every Arduino board made by Arduino has the board type printed on it. The name will typically be printed on the front and the back of the board. Some boards might only have it printed on one side.
Many Arduino clones may not print their equivalent Arduino board type on the board. In these cases, they’ll typically print their own board type, this can be searched on the internet to find out which Arduino board it’s equivalent to.
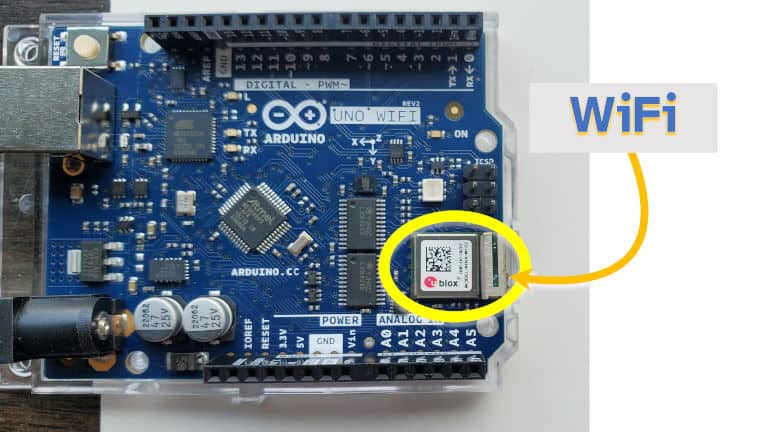
4. Look for a WiFi chip
Some Arduino models come with a large u-blox WiFi chip that stands out and makes the board easy to identify. The Arduino models that have a WiFi chip include:
- UNO WiFi Rev 2
- MKR WiFi 1010
- Nano 33
The MKR1000 also comes with WiFi, but it’s not on a separate chip. Check out Step 1 in this guide to see if you have an MKR1000.
If you’re interested in exactly which boards come with WiFi, I wrote a whole guide to that here: chipwired.com/arduino-board-wifi-guide/
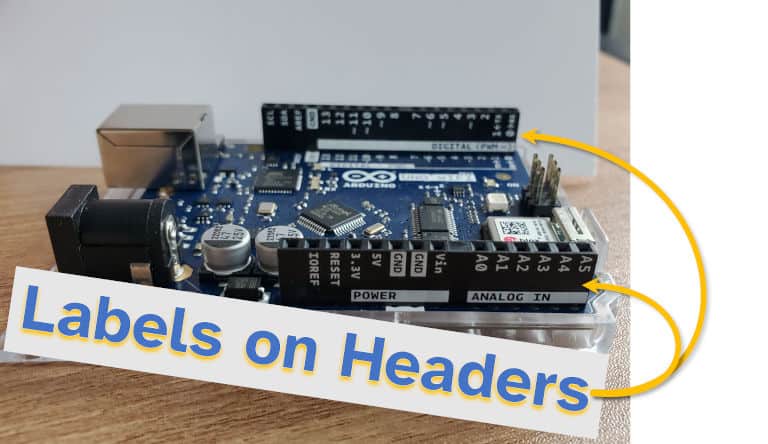
6. How many I/O pins does it have
Different Arduino models typically come with different numbers of input and output pins. These are often labelled on the board; digital pins are numbered starting at 0 and analog pins are numbered starting at 0 with an “A” prefix (e.g. “A1”, “A2” etc.). The number of pins for each of the common Arduino models is listed in the table below:
| Arduino Board | Digital Pin Count | Analog Pin Count |
|---|---|---|
| UNO Rev 3 | 16 | 6 |
| Mega 2560 | 54 | 16 |
| Nano | 22 | 8 |
| Due | 54 | 12 |
| Leonardo | 20 | 12 |
| Micro | 20 | 12 |
| UNO WiFi Rev 2 | 14 | 6 |
| Yun Rev 2 | 20 | 12 |
| MKR 1000 | 8 | 7 |
| MKR WiFi 1010 | 8 | 7 |
7. Check the dimensions of the board
Arduino boards are typically between 6cm and 10cm in length, and 2.5cm or 5.3cm in width. This corresponds to roughly 2.5-4 inches in length and 1-2 inches in width. The smallest Arduino models are the Nano and Micro, which are under 5cm in length and less than 2cm in width.
The length and width of common Arduino models are included in the table below:
| Arduino Board | Length | Width |
|---|---|---|
| UNO Rev 3 | 7cm / 2.7in | 5cm / 2.0in |
| Mega 2560 | 10cm / 4.0in | 5cm / 2.0in |
| Due | 10cm / 4.0in | 5cm / 2.0in |
| Leonardo | 7cm / 2.7in | 5cm / 2.0in |
| Micro | 5cm / 2.0in | 2cm / 0.7in |
| UNO WiFi Rev 2 | 7cm / 2.7in | 5cm / 2.0in |
| MKR 1000 | 6cm / 2.4in | 2.5cm / 1.0in |
| MKR WiFi 1010 | 6cm / 2.4in | 2.5cm / 1.0in |
Typically I haven’t found it very handy to measure the size of an Arduino board to determine which model it is. Measuring the board dimensions also doesn’t help much with clone Arduinos, as an “Arduino compatible” board can be built on a wide variety of PCB sizes.
How to Identify Arduino Version
Some Arduino families have multiple revisions of a board. Particularly the MKR, Nano, and UNO families.
The easiest way to identify the version of an Arduino board is to plug it in to a computer and use the Arduino IDE to read the board number and associated details. The label on the microcontroller can also indicate the revision of the Arduino as different versions use different microcontrollers (even in the same family.
Refer to Step 1 and Step 2 in his guide for more details on how to read the label on the microcontroller and how to use the IDE to read the board details.
References
Board size and microcontroller type information came from Arduino’s website: UNO Rev 3, Mega 2560, Nano 33, Due, Leonardo, Micro, UNO WiFi Rev 2, Yun Rev 2, MKR 1000, MKR WiFi 1010.
Worried you might have a fake Arduino? Check out the guide I wrote to figure out if you purchased a genuine Arduino: chipwired.com/avoid-fake-arduino-how-to/