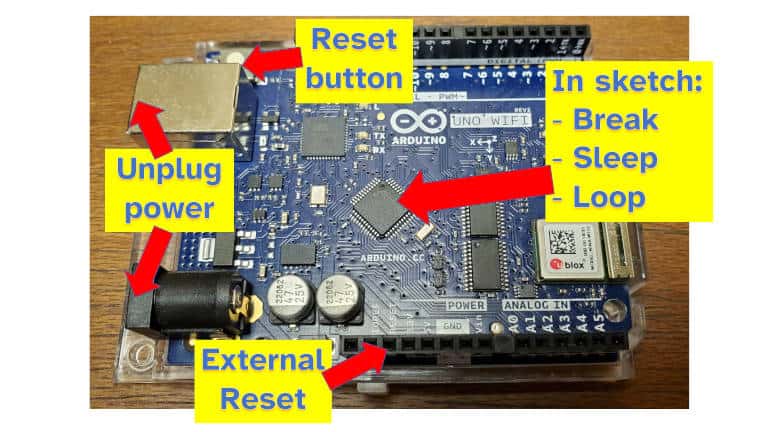
An Arduino can be stopped from running by unplugging the power, pressing the reset button, triggering an external reset, or by executing certain commands in a sketch such as sleep. Any of these approaches can be used to stop an LED blinking, stop a sketch running, or generally stop any Arduino program from processing data.
In this guide I’ve put together a list of all the different ways you can stop an Arduino running, including some out-of-the-box ideas such as using the watchdog timer.
1. Turn off the power by unplugging the Arduino safely
An Arduino can be safely disconnected from a power supply typically at any time. When disconnected, it will stop running its current program and lose nearly all of its memory. Only data saved to the EEPROM and program memory will be preserved. When power is restored, the Arduino will commence running its last sketch from the setup() function.
The only situation so far I’ve found unsafe to unplug an Arduino is when it’s being programmed. Even then, I have removed the power when the IDE is programming it and it seems to still be OK. I imagine if you’re uploading a new bootloader, that might be a time to be careful about unplugging it.
When the power is restored to an Arduino:
- It runs the
setup()function again - All variables and data are gone (unless saved safely – see below)
- Any peripherals will have to be set up again
Variables and data can be safely saved when the power is shut off by using the EEPROM, which does not lose memory when power to the Arduino is disconnected. EEPROM is a section of memory that is not lost when an Arduino is reset or loses power. It can be thought of as a small SD card for an Arduino.
There is a limit on how many times the EEPROM can be written to: Approximately 100,000 writes per address. I’ve never seen what happens when this limit is exceeded, though I imagine the Arduino will eventually get to the point where writing to the used-up address does nothing.
Want to know more about how to use the different types of memory on an Arduino (EEPROM, flash, etc.)? Check out the guide I wrote here: chipwired.com/arduino-memory-amount-guide
Here’s some basic code to save a measurement to the first byte of EEPROM:
int eeAddress = 0;
void setup(){
  byte last_measure;

  // read byte from EEPROM and store in last_measure:
  EEPROM.get(eeAddress, last_measure);

  Serial.begin(9600);
  Serial.print("Last measure: ");
  Serial.println(last_measure);
}
void loop(){
  byte measure; // can store values 0-255
  measure = take_measurement();

  // store measure in EEPROM:
  EEPROM.write(eeAddress, measure);

  /*
  EEPROM has a limited number of writes
  Since this example is in frequently called loop, we delay a little:
  */
  delay(20000);
}
If it seems like the Arduino is hanging or crashing, check out my guide on different ways an Arduino can crash or hang (I did them to my own Arduino to show you what can happen), it’s over here: chipwired.com/arduino-crash-hang-guide/
2. Reset the Arduino via the button (or code)
Pressing the reset button on an Arduino stops the microcontroller executing code by activating its external reset pin. Once the reset button is released, the Arduino microcontroller will start running its last sketch from the setup() function. As the button does not disconnect power from the board, peripherals such as the WiFi chip, will still be in their last state and should be initialised again.
Similarly to removing the power, any data that’s not in the EEPROM or program memory will be lost when the microcontroller is reset.
It is also possible to trigger this reset using code in a sketch. From the research I conducted, it seems the best way to do this is to use the watchdog timer.
An example of how to reset an Arduino from a sketch (using the watchdog timer) is included below:
#include <avr/wdt.h>

void setup(){
  //setup
  wdt_enable(WDTO_1S);
}

void loop(){
  for(int i=0; i<=5; i++){
    // loop to do something
    delay(200)
    // reset watchdog timer
    wdt_reset();
  }
  // loop infinitely
  // (wdt will trigger reset)
  while(1);
}
3. Stop a loop from running by using break
If your Arduino gets stuck in an infinite loop that you need to stop running, there is a command that can be used in a sketch to break free of the loop.
An Arduino can break from a loop using the break keyword. When writing a sketch that uses an infinite loop, including the break keyword will give the Arduino a path to exit the loop. This does not apply to the loop() function which can be broken using the return keyword.
Here’s an example of how to break an infinite loop:
void loop() {
  int reading_one = 0;
  int reading_two = 0;
  while(reading_one == 0){
    readValue(reading_one);
    readValue(reading_two);
    if (reading_two > 3) break;
}
4. Trap an Arduino in a loop to stop it executing other code
If your goal is to stop the Arduino executing something else, such as if you want it to wait while a peripheral is getting ready, you can trip the Arduino in an infinite loop.
To make an infinite loop in Arduino, use one of the following:
while(true)for( ; ; )
Either of these loops will never exit. To have the Arduino exit the loop, the break keyword can be used.
An Arduino can stop executing its current sketch forever by being put into an infinite loop. As an Arduino is typically always running within an infinite (the loop() function), using an infinite loop is typically only required while waiting for something.
5. Put the Arduino to sleep with Sleep Mode
An Arduino can stop running most of its functions and significantly reduce its power consumption by entering Sleep Mode. The method to wake up the Arduino can be chosen before putting it in sleep mode; typically an Arduino is configured to wake up by timer or by external interrupt.
A variety of sleep modes are available depending on which board you’re using. A sample of code I tested on my UNO WiFi Rev 2 is included below on how to put it to sleep:
#include <avr/sleep.h>
int x;
void setup() {
  // see below for sleep modes
  set_sleep_mode(SLEEP_MODE_PWR_DOWN);
  x = 10;
  pinMode(LED_BUILTIN, OUTPUT);
}

void loop() {
  digitalWrite(LED_BUILTIN, HIGH);
  delay(200);
  digitalWrite(LED_BUILTIN, LOW);
  delay(200);
  x--; // blink the LED a few more times before sleeping
  if (x > 0) return;
  sleep_mode();
}
I had to read the code of the sleep library to figure out the sleep mode constants to use, it seems to be:
- For idle (slight reduction in power):
SLEEP_MODE_IDLE - For standby (more reduction in power):
SLEEP_MODE_STANDBY - For power-down (most reduction in power):
SLEEP_MODE_PWR_DOWN
When I ran the earlier code snipped with IDLE or STANDBY sleep modes, the LED still blinked. Only SLEEP_MODE_PWR_DOWN stopped code from running (the LEDs no longer blinked when the Arduino was put to sleep).
If you’re interested in how much power an Arduino uses while it’s in sleep mode, this is one of the tests I conducted when figuring out how much power an Arduino actually uses. Check out my test results here for more details: chipwired.com/arduino-power-use
6. Use an external relay to cut the power
It is possible to connect the Arduino’s own power supply to a relay, and then control that relay from an Arduino sketch. This allows the Arduino to turn itself off or reset itself using a relay it controls.
To use a relay to reset an Arduino:
- Connect the power supply to the back contacts of the relay, so that the energising the relay coil breaks the Arduino power supply circuit
- Connect the coil to one of the output pins on the Arduino
- Configure the sketch to start the output pin as LOW, and then set it to HIGH when you want to reset the Arduino
Disclaimer: I haven’t tried this myself! Please get in touch and let me know if this actually works for you. The steps above are based on my knowledge of relay circuits and Arduino capability, and not the result of an experiment I’ve run.
The Arduino output pins may toggle between high and low when the chip first turns on, so I’d recommend trying a slow to pick configuration. These may also be referred to as “timed open” relays.
References
Here are the references I use to put this together
Chris likes to experiment with Arduino code – sometimes that means it gets stuck! These are some of the ways to get it stuck on purpose, and to reset it whenever it does get stuck.