An Arduino often comes in a box by itself, and it can be confusing to figure out what to buy to begin with. This is what happened to me – my first Arduino didn’t come with any parts and I had no idea I even had to buy a cable to go with it. I put together this guide to hopefully give you an idea – based on the sort of project you want to build – what to buy when first starting out with Arduino.
A new Arduino requires a power or USB cable, a breadboard and wire, and some sensors or a shield. These components typically cost $5 to $20 each and can be used in a variety of projects. It can often be cheaper to purchase these components individually rather than as part of a starter kit.

This guide is arranged to give you an idea of what components you need based on the type of project you want to start with:
- Software only projects are those that don’t need extra components, these projects only use a sketch to achieve their tasks (often I’ve found that task is communicating with other Arduino boards, or the internet)
- Sensor projects use sensors connected to the Arduino to collect data, think weather stations and movement detectors
- Hardware projects, these are projects where you control something, typically a motor such as when building a robot
1. Cables
Every new Arduino needs cables. When I first bought my Arduino, it didn’t come with a power cable or a USB cable. I had to buy this separately.
Buying an Arduino as part of a kit means cables can be included, however kits can include many components that you’re paying for but don’t need.
Cables for Arduino typically cost $6 to $15. These cables are used to power the Arduino or for the Arduino to communicate over USB (or both). The best place to buy cables is often the same store the Arduino was purchased from as savings by purchasing cables online can be minimal.
| Cable | Typical Cost |
|---|---|
| USB | $6 – $10 |
| USB Mini | $6 – $10 |
| USB Micro | $6 – $10 |
| Power Adapter | $8 – $15 |
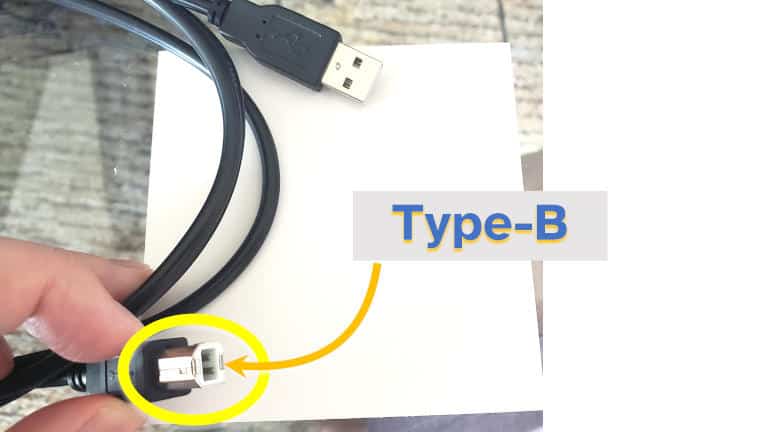
For USB cables, the UNO and Mega are the normal Type B cable (sometimes also called printer cable), Nano is mini, and Due and MKR are micro – all are Type B. More details can be found in my guide here: chipwired.com/arduino-cables-and-wires/
All projects – software only; software and sensors; software, sensors, and actuators – will need a cable at some point, even if it’s only used to program the Arduino.
| Software Projects | Sensor Projects | Hardware Projects |
|---|---|---|
| ✓ | ✓ | ✓ |
2. Shields
Shields are boards which plug into an Arduino to add functionality. Common uses of shields include adding WiFi or Bluetooth to an Arduino which doesn’t have these, adding sensors, controlling motors, adding relays, and adding SD card storage.
I’ve found shields useful for sensor and hardware projects, where the functionality of an Arduino needs to be extended to work with the outside world.
| Software Projects | Sensor Projects | Hardware Projects |
|---|---|---|
| ✗ | ✓ | ✓ |
Some Arduino boards include enough sensors to build sensor projects without a shield. For example, the Nano 33 includes an accelerometer for sensing movement.
Arduino shields typically cost $20 to $34, however some niche shields can cost over $60. Shields produced by third-parties, such as Sparkfun and Adafruit, are typically a few dollars cheaper for the same functionality.
| Shield | Cost |
|---|---|
| Ethernet | $24 |
| GPS | $26 |
| CAN | $34 |
| RGB LED (for display) | $26 |
| SD card and flash memory | $22 |
| Motor Shield | $20 |
I used Jameco to compare prices for shields in this case. If you’re interested in where to buy shields online, I wrote a guide where I rated various Arduino supply stores based on their costs for shields and their availability for shipping. Check it out here: chipwired.com/arduino-component-shops/
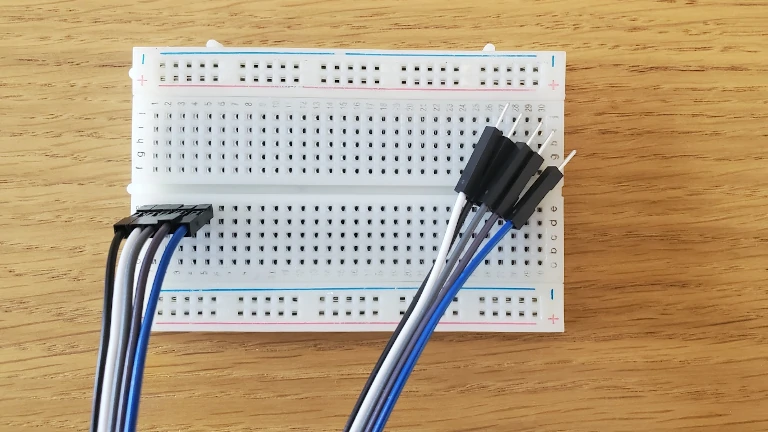
3. Wires
Wires are used to connect an Arduino to a breadboard or to another board that has headers. Wires are different from cables in that wires can be used for any purpose whereas cables are typically designed with a purpose in mind; a cable is usually a bunch of wires with special connectors on each end.

I’ve found wires are useful in any project where you need to use a breadboard. Typically this includes when prototyping for complicated projects, such as controlling motors or reading many sensors. Simple sensor projects may not need wires, especially if the sensor is built in to the Arduino or added using a shield. Wires are also useful for connecting batteries to the Arduino.
| Software Projects | Sensor Projects | Hardware Projects |
|---|---|---|
| ✗ | (sometimes) | ✓ |
Expect to spend about $3 – $6 on wires. These can be purchased as:
- A bundle of wires (pictured above – these can be separated into individual ones)
- On a reel which you have to cut yourself – look for AWG 24 wire if buying on a reel
4. Passive Components (LEDs, Resistors, Capacitors, Inductors)
Most circuits connected to an Arduino are a combination of passive components, active components (transistors), or integrated circuits (other microchips).
LEDs can be useful for indicating the status of the Arduino, such as if a particular circuit is being used, or to communicate information about where a sketch is in its execution. All Arduino boards come with at least one built in LED, more can be added.
Resistors are typically used to adjust the voltage and/or protect other parts of the circuit (by lowering the current). Most of the time when I use a resistor it’s based on the data sheet of a sensor (or integrated circuit chip) and I follow their instructions to decide how much to use.
Capacitors are useful for filtering voltage and buffering charge – I’ve seen them most often used with audio projects, or as part of battery circuits. Inductors in Arduino circuits can help with voltage regulation, or used as part of the internals of a motor.
| Software Projects | Sensor Projects | Hardware Projects |
|---|---|---|
| ✗ | (sometimes) | ✓ |
Passive components are useful in sensor projects and hardware projects. I’ve found many sensors require an additional couple of passive components to work well with Arduino (typically a resistor or two) – typically the only sensor projects that don’t are those where the sensor is built in to the Arduino. Complicated projects, such as ones that control motors, require passive components as well.
Typical costs of passive components are outlined in the table below:
| Component | Cost |
|---|---|
| LEDs | $1 – $2 per bundle |
| Resistors | $10 for a 300pc kit |
| Capacitors | $10 for a 100pc kit |
| Inductors | $21 for a bag |
I took prices from Jameco.
5. Sensors and Input Devices
Sensors are at the core of many Arduino projects. An Arduino gets its information about the world via the sensors that are connected to it. Many Arduino projects are the implementation of a sensor whose data is then reported back to a source (if you’re interested in how an Arduino can save data, check out my guide here). Other input devices include buttons and switches.
I’ve found sensors important to most Arduino projects which rely on external components (i.e. anything except software-only projects). Sensors (and other input devices) provide the Arduino with data about the ‘state’ of the world so that its sketch can make decisions about which action to take.
| Software Projects | Sensor Projects | Hardware Projects |
|---|---|---|
| ✗ | ✓ | ✓ |
Most sensors for Arduino can be purchased for less than $8. This includes sensors for temperature, humidity, pressure, current, light, motion, sound, and many others. Some sensors can cost more than this, for example some gas sensors can cost $100.
I wrote a whole guide to over 20 types of sensors that can be used with Arduino, check it out here: chipwired.com/arduino-sensors-uses-costs-connections/
6. Breadboards
Breadboards are a prototyping tool that allow circuits to be built without soldering. The arrangement of components in a circuit, and the types of components, are easy to change when using a breadboard.
Using a breadboard is an important part of figuring out an Arduino circuit that works. Once the circuit works on the breadboard, you can solder it on to a circuit board.
Most Arduino projects should use a breadboard at some stage. Using a breadboard allows you to work the bugs out of your sketch and your circuit before you commit to soldering it all together.
| Software Projects | Sensor Projects | Hardware Projects |
|---|---|---|
| ✗ | (sometimes) | ✓ |
I recommend prototyping even the most simple projects using a breadboard. If you have to plug anything into your Arduino and get it working with a sketch, test it out on a breadboard first – breadboards help debug your sketches. It can be hard to figure out if there is a bug in your code or in your circuit, and breadboards give you a way to reduce errors in your circuits to help you debug sketches.
Breadboards start at about $5 for a 400 point breadboard. The number of points are the number of connections that you can make as part of a circuit. Breadboards come in larger sizes and can cost up to $35. I’ve found 400 points sufficient for simple Arduino circuits.
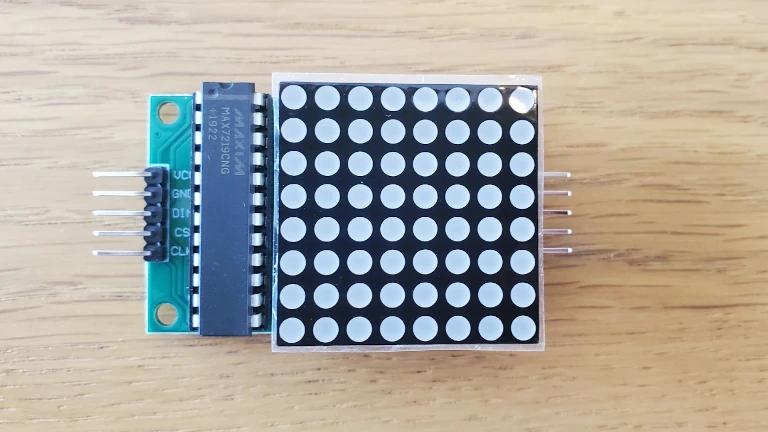
7. Microchips and Active Components
Microchips, integrated circuits, and active components can provide specific functions that an Arduino can control from its sketches. Some examples of these can include:
- Flash storage chip, to give your Arduino additional space to store data;
- Transistors, such as in an analogue amplifier;
- Control chips, such as those used to control displays.
I’ve found that some sensors rely on a microchip interface that you have to communicate with using SPI or I2C. Hardware projects might also find it beneficial to communicate with active components, such as transistors, for controlling power in another circuit.
| Software Projects | Sensor Projects | Hardware Projects |
|---|---|---|
| ✗ | (sometimes) | ✓ |
Typical costs of active components can be as low as a few cents for transistors, up to hundreds of dollars for complex or specialised microchips. Active components for most Arduino projects I’ve seen should cost less than $20. Anything more than this and see if it’s worth buying a shield for these components instead (such as the GPS shield).
8. Actuators and Output Devices
An Arduino can take action using an actuator (or other output device). Actuators are the components that an Arduino uses to affect the physical world. Example actuators and output devices include:
- LED or LCD displays,
- Motors,
- Speakers.
I consider any projects that use this to be advanced, as far as Arduino projects go. Lots of work has to be put into a sketch, lots of bugs can come up, and lots of problems can arise with the circuits (I highly recommend extensive prototyping using a breadboard if you’re planning to connect these components to your Arduino).
These are also the most useful things an Arduino can do. Being able to read in data from a sensor is great, particularly for data analytics, but affecting the world is at the heart of many electronics projects. Some of the most useful and most fun Arduino projects affect the physical world in some way – robots that move around, displays that report data instantly, speakers that play sound etc.
| Software Projects | Sensor Projects | Hardware Projects |
|---|---|---|
| ✗ | ✗ | ✓ |
Typical costs of output devices can range from $1 for a simple motor, up to $40 (or even higher) for a display device. If using motors, I also recommend picking up a motor shield for around $20, or something similar, so that the Arduino isn’t providing power to the motors directly from its output pins.
When Chris first started with Arduino he had no idea what to buy. This was despite his background in electronics and programming. Hopefully this guide gives you some ideas of what you need to get started.